Hightouch can turn Azure Synapse into a marketing, sales, success and operational engine.
Overview
Hightouch lets you pull data stored in Azure Synapse and push it to downstream destinations. Connecting Hightouch to Azure Synapse requires some setup in both platforms. In Azure Synapse, you need to configure your firewall settings.
Azure firewall setup
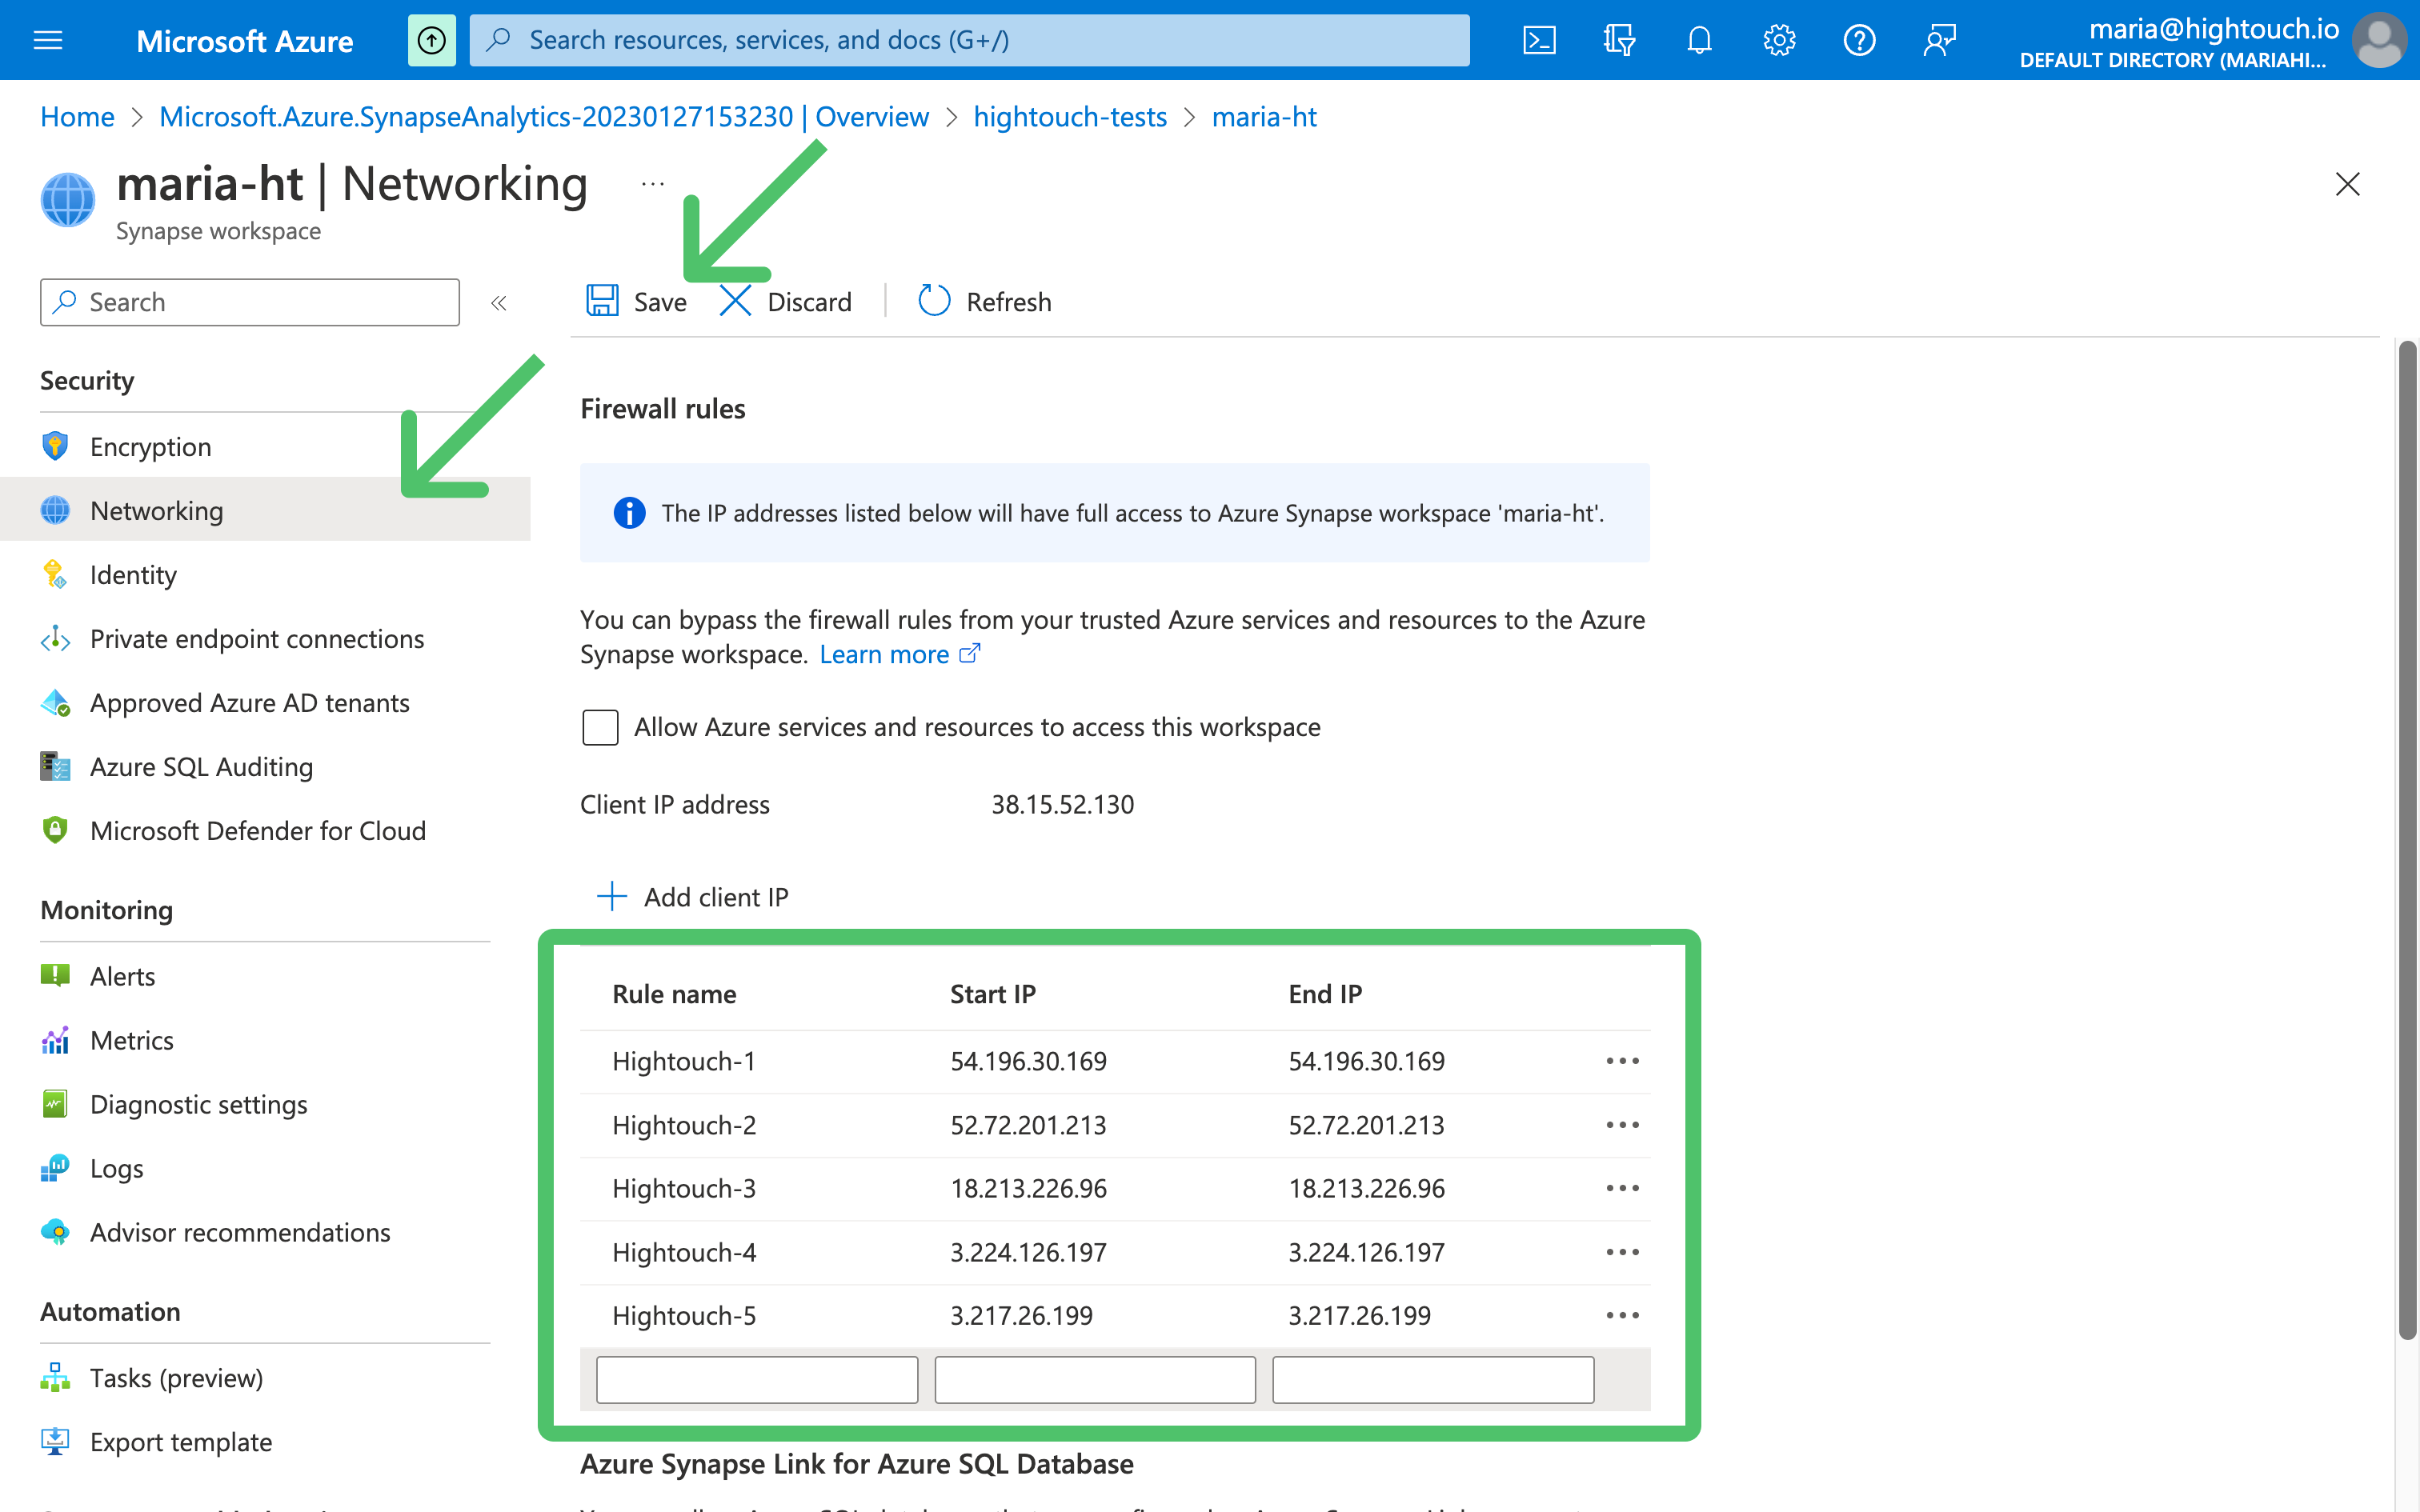
By default, Azure protects your Synapse data from any external IP address from connecting to your Synapse workspace. Follow these steps to add Hightouch's IP addresses to the firewall.
- Log into your Azure Console Dashboard.
- Click on your Synapse workspace under Resources.
- In the left sidebar, select Security > Networking .
- Allowlist the Hightouch IP addresses for your region.

- Click the Save button in upper left corner.
Connection configuration
In Hightouch, go to the Sources overview page and click the Add source button. Select Azure Synapse and follow the steps below.
Choose authentication method
When creating an Azure synapse source, you have four options to authenticate:
- Password: Use a username and password
- Connection String: Provide the full URI Connection String
- Microsoft Service Principal with Client Secret: Use a Microsoft Service Principal created using Microsoft Entra ID with a Client Secret
- Microsoft Service Principal with Certificate: Use a Microsoft Service Principal created using Microsoft Entra ID with a signed Certificate
Choose connection type
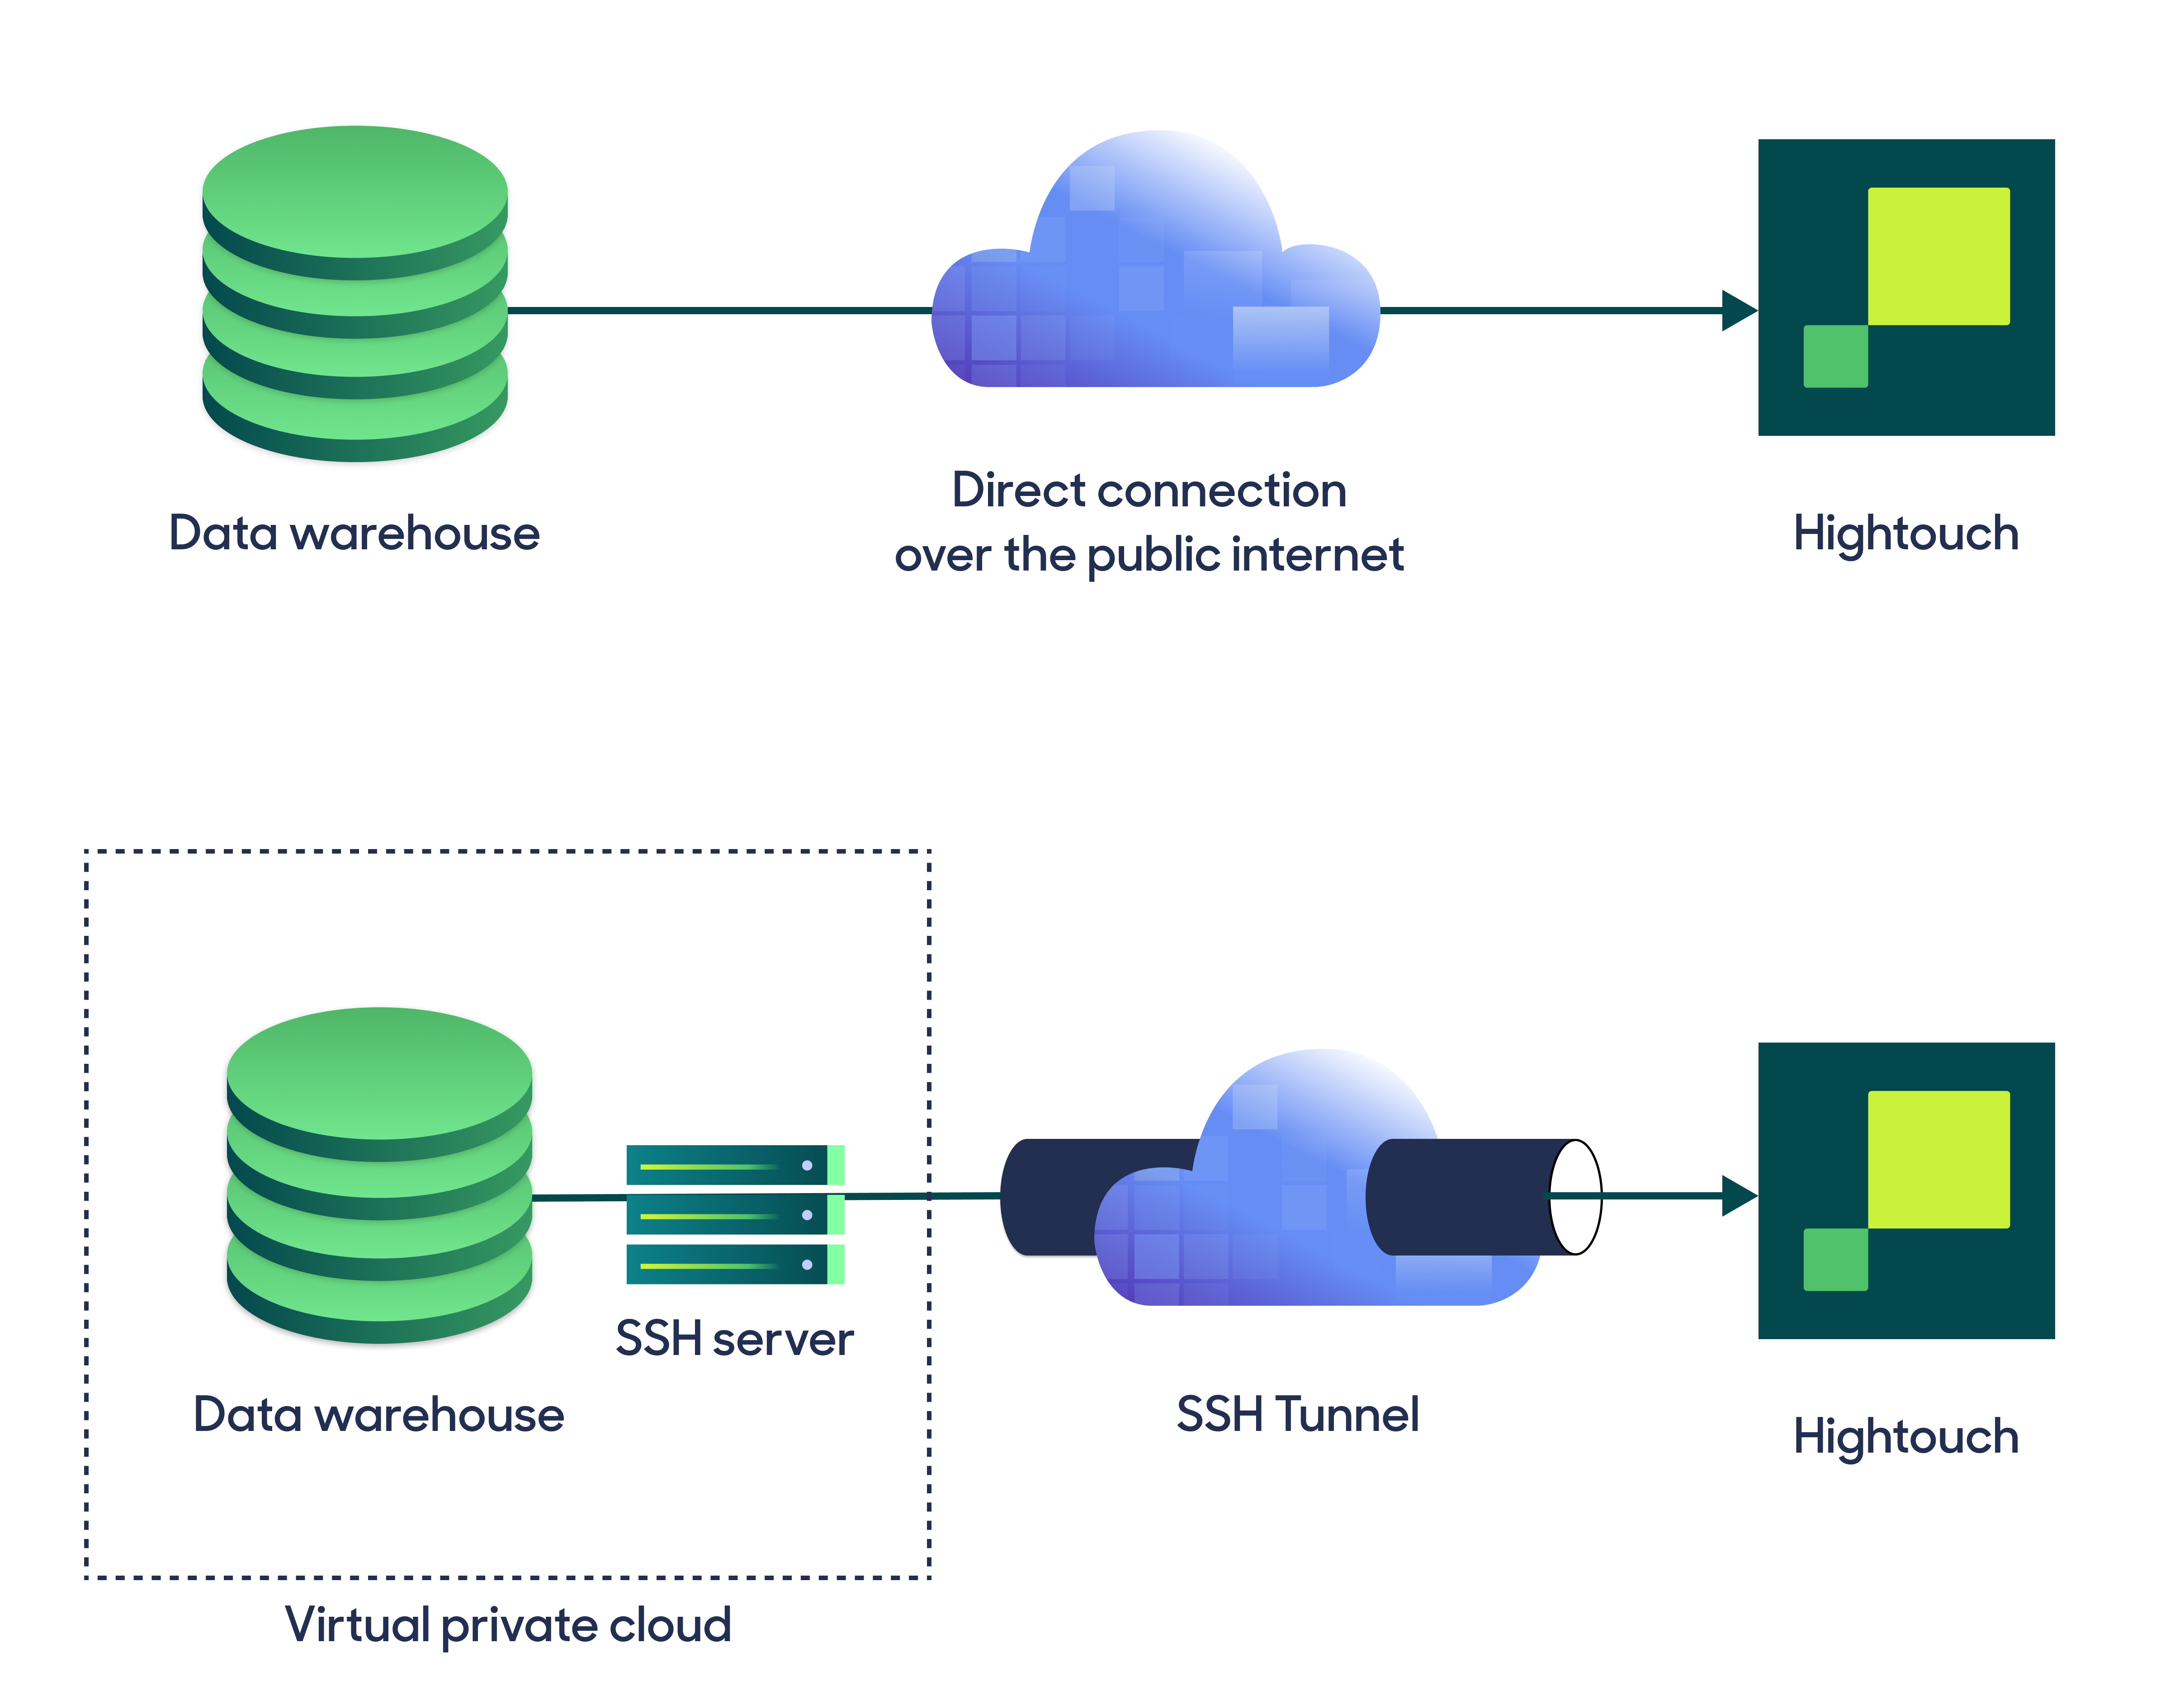
Hightouch can connect directly to Azure Synapse over the public internet or via an SSH tunnel. Since data is encrypted in transit via TLS, a direct connection is suitable for most use cases. You may need to set up a tunnel if your Azure Synapse instance is on a private network or virtual private cloud (VPC).

Hightouch supports both standard and reverse SSH tunnels. To learn more about SSH tunneling, refer to Hightouch's tunneling documentation.
Configure your source
If connecting via Password or Microsoft Service Principal, you must first enter the following required fields into Hightouch:
- Host: The hostname or IP address of your Azure Synapse.
- Port: The port number of your Azure Synapse. The default is 1433, but yours may be different.
- Database: The name of the database in your Azure Synapse.
Optionally you can enter a Request timeout duration and whether to Trust server certification.
Password
To connect using a username and password, enter the following fields into Hightouch:
- Username: This can be your personal Azure Synapse login or a dedicated user for Hightouch.
- Password: The password for the user specified above.
Microsoft Service Principal
To connect using a Microsoft Service Principal, use the following instructions to create a new Service Principal:
- Sign in to the Microsoft Entra admin center.
- On the sidebar, select Identity > Applications > App registrations.
- Select New registration.
- Pick a name for your application and select Accounts in this organizational directory only as the supported account type.
- Click Register.
- Note your newly created Application (client) ID and Directory (tenant) ID.
- Click Add a certificate or secret.
From here, you can opt to use either a Client secret or a Certificate.
Client secret
- Select the Client secrets tab.
- Click New client secret.
- Name your client secret and select its expiration date. To maintain access to Azure Synapse, make sure to refresh your client secret prior to its expiration.
- Note your client secret Value now as it cannot be retrieved later. It will be used to connect Hightouch to Azure Synapse.
Certificate
- Select the Certificates tab.
- Click Upload certificate and upload a valid signed certificate.
- Note your certificate's Thumbprint.
For more detailed instructions on service principal creation, you can check out Microsoft's documentation.
Synapse configuration
Next, we need to grant the service principal access to the Azure Synapse instance:
- Navigate to your instance with the Azure Portal
- On the sidebar, select Access control (IAM)
- Click Add > Add role assignments
- Select the role you would like to assign to your service principal (Hightouch will need at least the Reader role)
- On the next screen, select the service principal that was created above and apply the changes.
For more details, please take a look at Microsoft's documentation.
Credentials
Finally, you can enter the following fields into Hightouch that were created during the above instructions:
- Tenant ID (or Directory ID)
- Client ID (or Application ID)
If you chose to create a Client Secret for your service principal, you'll enter it here.
If you instead chose to create a Certificate, enter in your certificate's Thumbprint and the associated private key. Make sure that the private key is in PEM format and includes the header and footer.
Connection String
If connecting via Connection String, simply enter your connection string in this format: Server=server;Database=database;User Id=username;Password=password;Encrypt=boolean.
Choose your sync engine
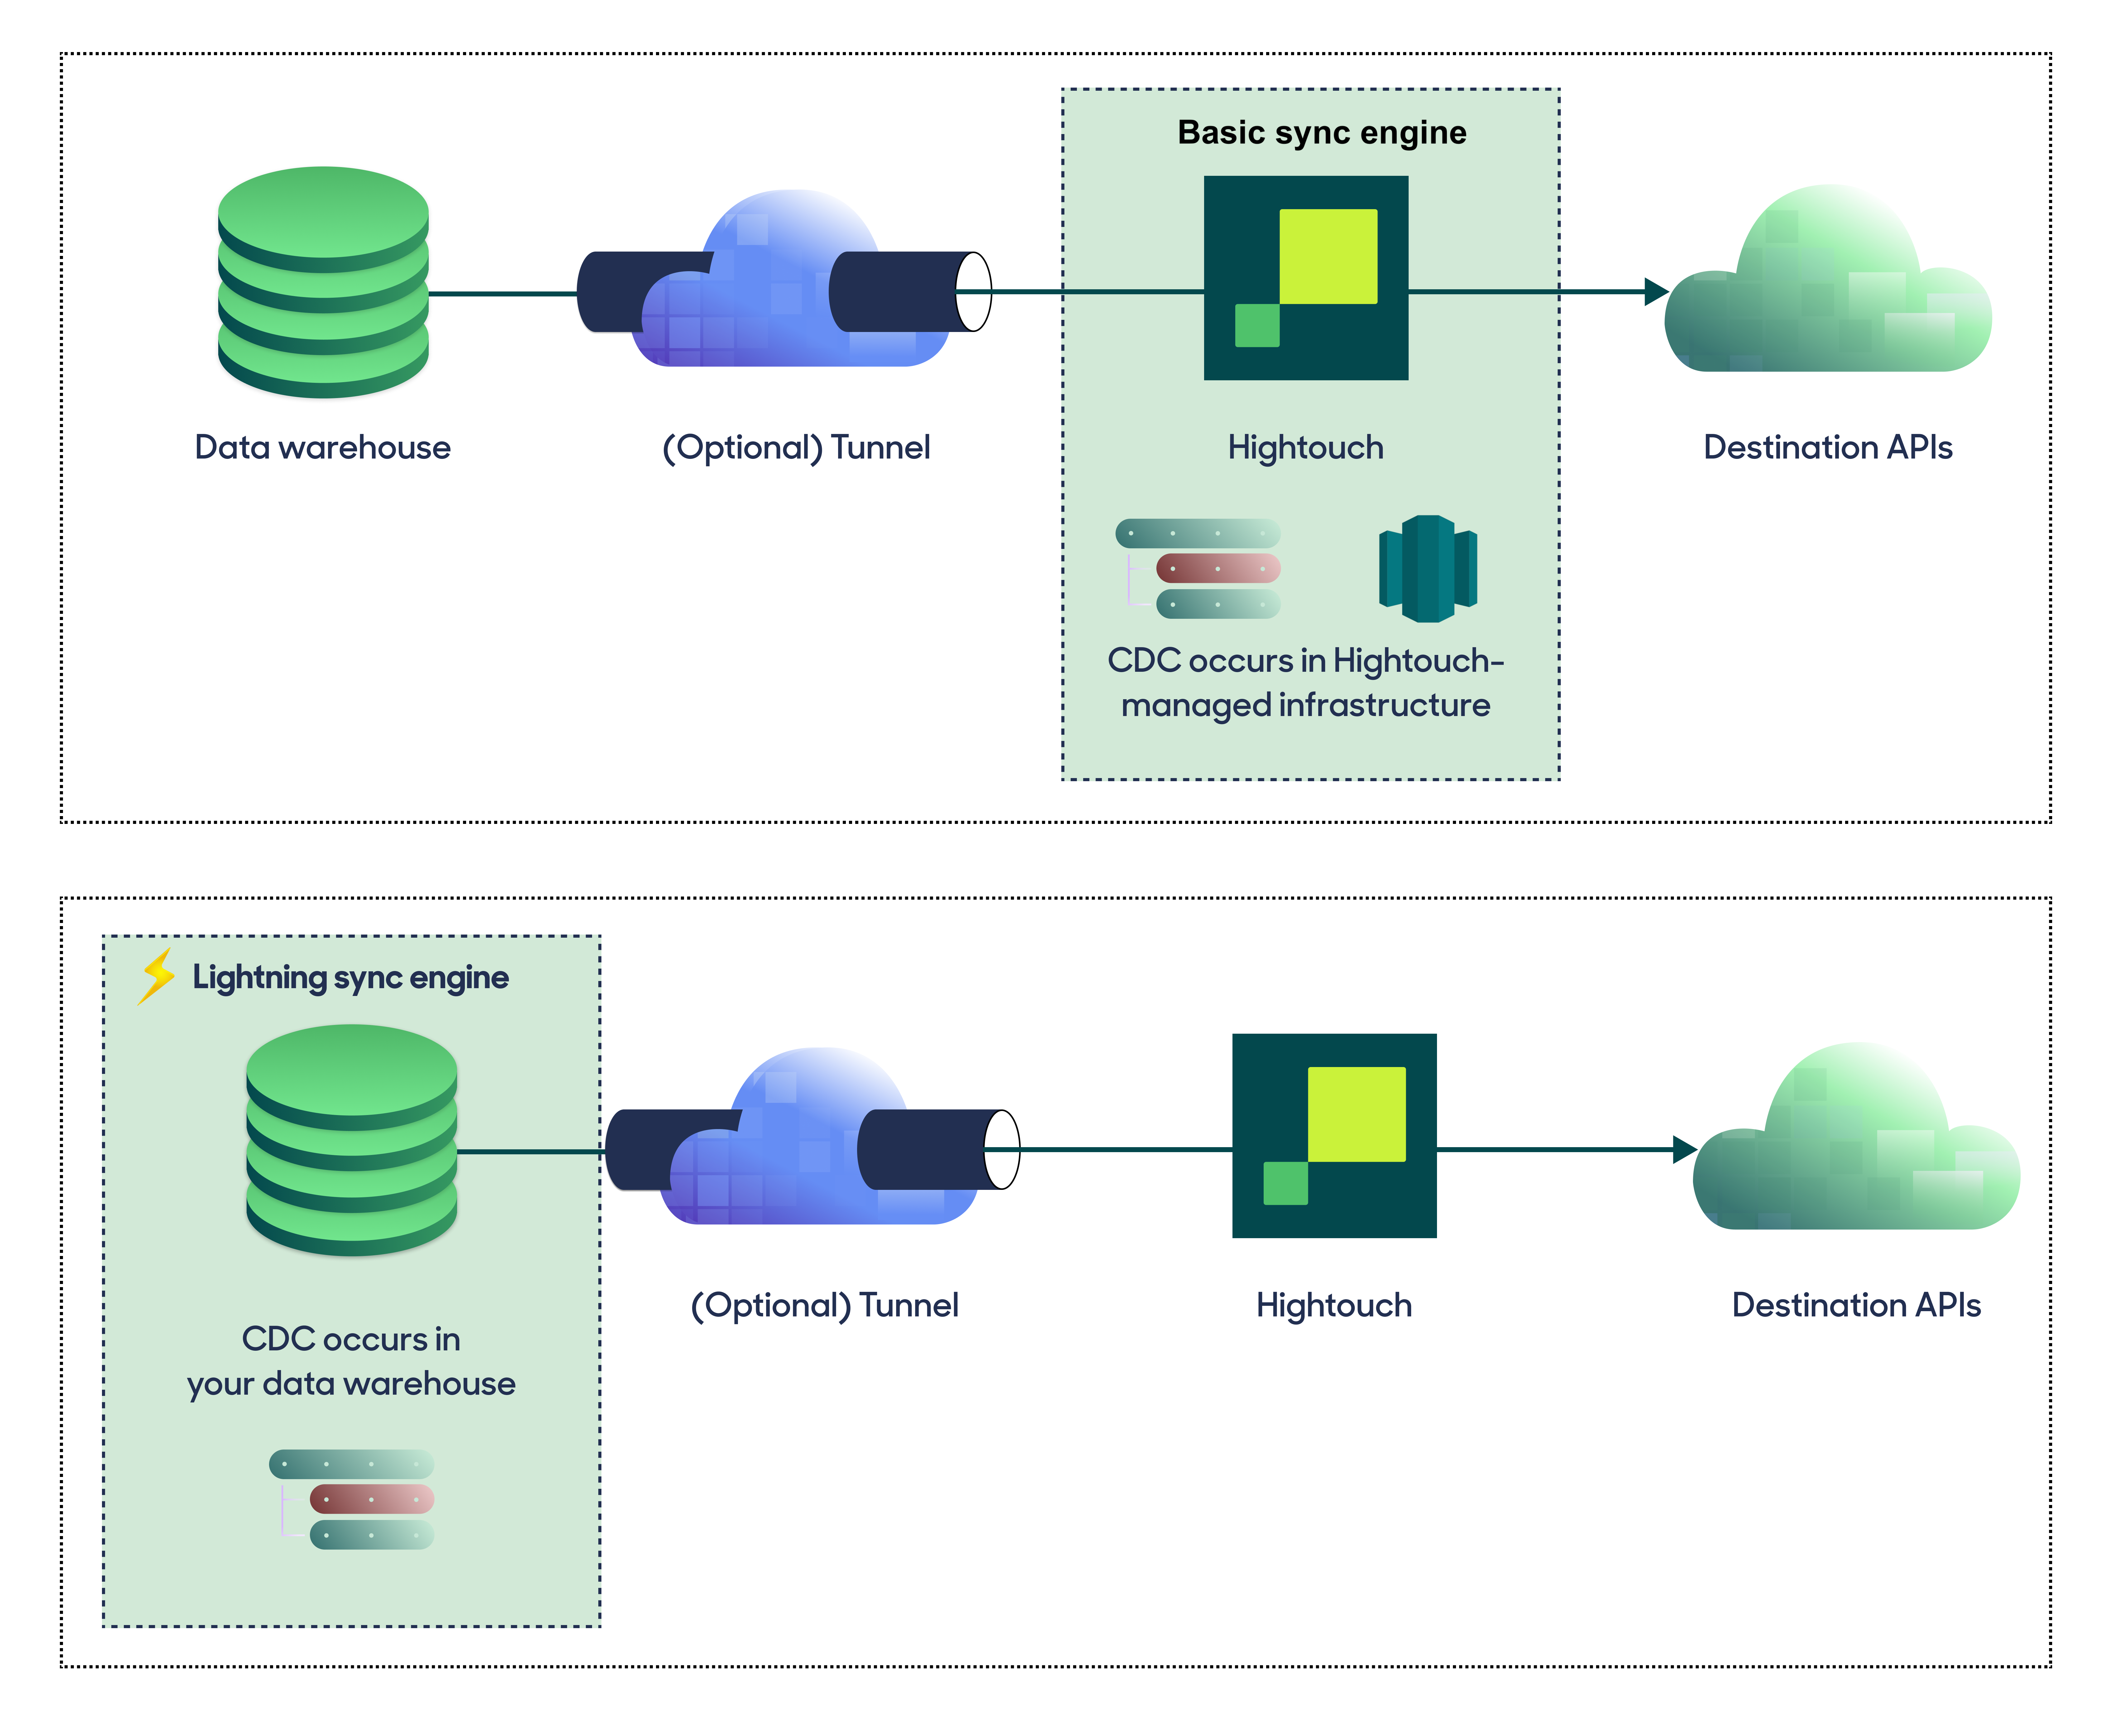
For optimal performance, Hightouch tracks incremental changes in your data model—such as added, changed, or removed rows—and only syncs those records. You can choose between two different sync engines for this work.
The Basic engine requires read-only access to Synapse. Hightouch executes a query in your database, reads all query results, and then determines incremental changes using Hightouch's infrastructure. This engine is easier to set up since it requires read—not write—access to Synapse.
The Lightning engine requires read and write access to Synapse. The engine stores previously synced data in a separate schema in Synapse managed by Hightouch. In other words, the engine uses Synapse to track incremental changes to your data rather than performing these calculations in Hightouch. Therefore, these computations are completed more quickly.

If you select the Basic engine, you can switch to the Lightning engine later. Once you've configured the Lightning engine, you can't move back to the Basic engine without recreating Synapse as a source.
To learn more, including migration steps and tips, check out the Lightning sync engine docs.
Basic versus Lightning engine comparison
The Lightning sync engine requires granting write access to your data warehouse, which makes its setup more involved than the Basic sync engine. However, it is more performant and reliable than the Basic engine. This makes it the ideal choice to guarantee faster syncs, especially with large data models. It also supports more features, such as Warehouse Sync Logs, Match Booster, and Identity Resolution.
| Criteria | Basic sync engine | Lightning sync engine |
|---|---|---|
| Performance | Slower | Quicker |
| Ideal for large data models (over 100 thousand rows) | No | Yes |
| Reliability | Normal | High |
| Resilience to sync interruptions | Normal | High |
| Extra features | None | Warehouse Sync Logs, Match Booster, Identity Resolution |
| Ease of setup | Simpler | More involved |
| Location of change data capture | Hightouch infrastructure | Synapse schemas managed by Hightouch |
| Required permissions in Synapse | Read-only | Read and write |
| Ability to switch | You can move to the Lightning engine at any time | You can't move to the Basic engine once Lightning is configured |
Lightning engine setup
Please note that Lightning engine is only supported for Azure Synapse instances that use a dedicated SQL pool. Serverless Azure Synapse does not have the capabilities to support the Lightning engine.
To set up the Lightning engine, run the following commands. Make sure to replace your_service_principal_or_user with the name of the service principal or user used to connect to your Synapse instance.
IF NOT EXISTS (SELECT 1 FROM sys.schemas WHERE name = 'hightouch_audit')
BEGIN
EXEC('CREATE SCHEMA [hightouch_audit]');
END;
IF NOT EXISTS (SELECT 1 FROM sys.schemas WHERE name = 'hightouch_planner')
BEGIN
EXEC('CREATE SCHEMA [hightouch_planner]');
END;
GRANT CONTROL ON SCHEMA::hightouch_audit TO [your_service_principal_or_user];
GRANT CONTROL ON SCHEMA::hightouch_planner TO [your_service_principal_or_user];
Test your connection
When setting up Azure Synapse as a source for the first time, Hightouch validates your credentials and access to your database. Once the test passes, click Continue to finish setup.
If you see the following error message, you need to update your firewall settings in your Azure Console.
Cannot open server 'hightouch-test' request by login. Client with IP address '54.196.30.169' is not allowed to access the server. To enable access, use the Windows Azure Management Portal or run sp_set_firewall_rule on the master database to create a firewall rule for this IP address or address range. It may up take up to five minutes for this change to take effect.
Next steps
Once your source configuration has passed the necessary validation, you've completed setting up Azure Synapse as a source. Next, you can set up models to define which data you want to pull from Azure Synapse.
The Azure Synapse source supports these modeling methods:
- writing a query in the SQL editor
- using the visual table selector
- leveraging existing dbt models
Tips and troubleshooting
To date, our customers haven't experienced any errors while using this source. If you run into any issues, please don't hesitate to . We're here to help.
