How to Sync Leads from Sigma to Hubspot
Marketing
B2B
intermediate
Learn how you can use Hightouch to sync contacts in your Sigma Workbooks to Hubspot.
Made by:Sigma
11 minutes
Keeping HubSpot contacts up to date is essential for both effective marketing and sales processes, and accurate reporting and analytics. High-quality data leads to a better experience for both your organization and your contacts.
Traditionally, your data teams export contacts as CSVs and send them to your marketing teams, who upload them into tools like HubSpot. The downside is that the data in those CSVs quickly becomes outdated. With each update, the CSV has to be re-exported by your data team and re-uploaded by your marketing team.
If you're leveraging a BI tool like Sigma to define lists of target users you can rely on those definitions to sync contacts to marketing tools like HubSpot or Marketo using Hightouch. This playbook walks through using Hightouch and a Sigma workbook to sync contacts to HubSpot, but you could apply the same general steps for syncing any contact information into any other marketing tool.
- Contact data in a Sigma-supported data source like Snowflake, Databricks, BigQuery, Redshift, etc. (this playbook uses Snowflake since it supports Sigma’s input tables feature)
- A Sigma account
- A Hightouch account
- A HubSpot account
After you’ve connected Sigma to Snowflake, you can define the contacts for your marketing campaign.
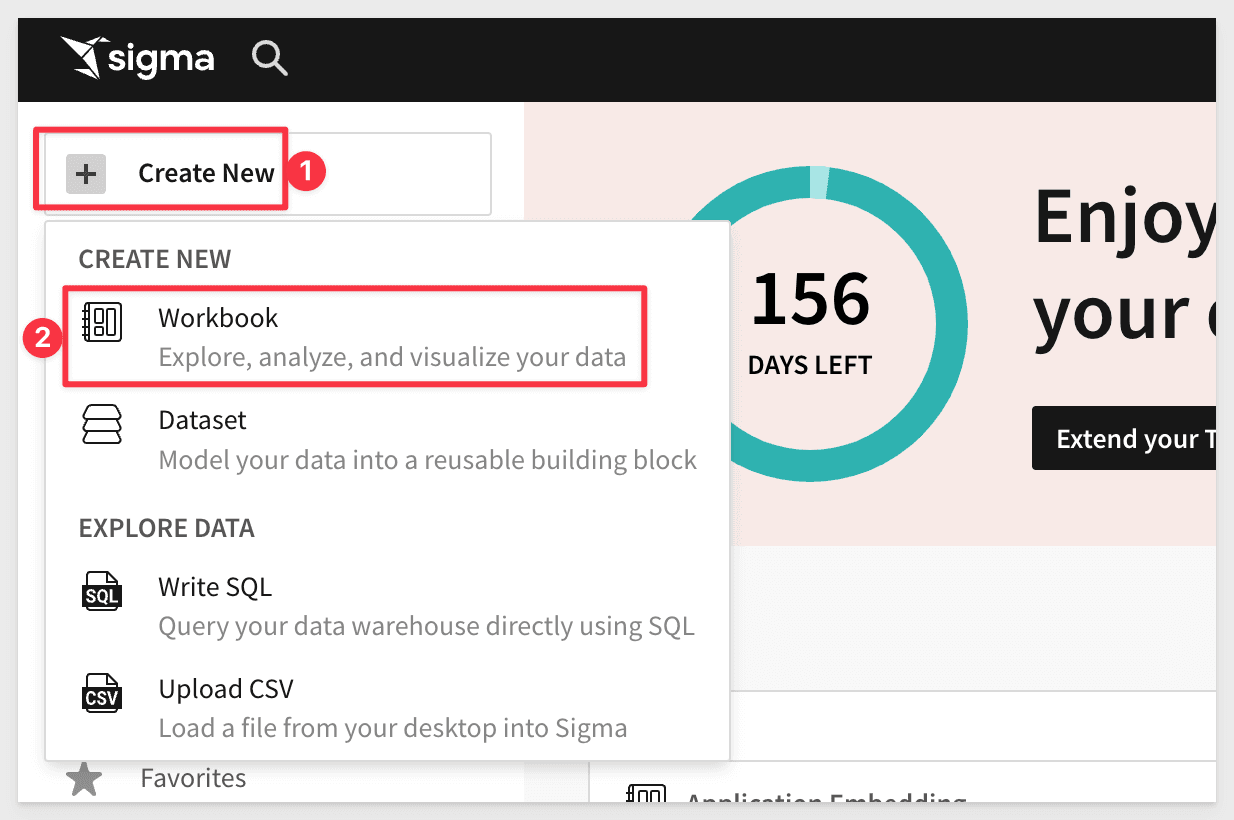
Click Create New and select Workbook:
Click to add a new Table:

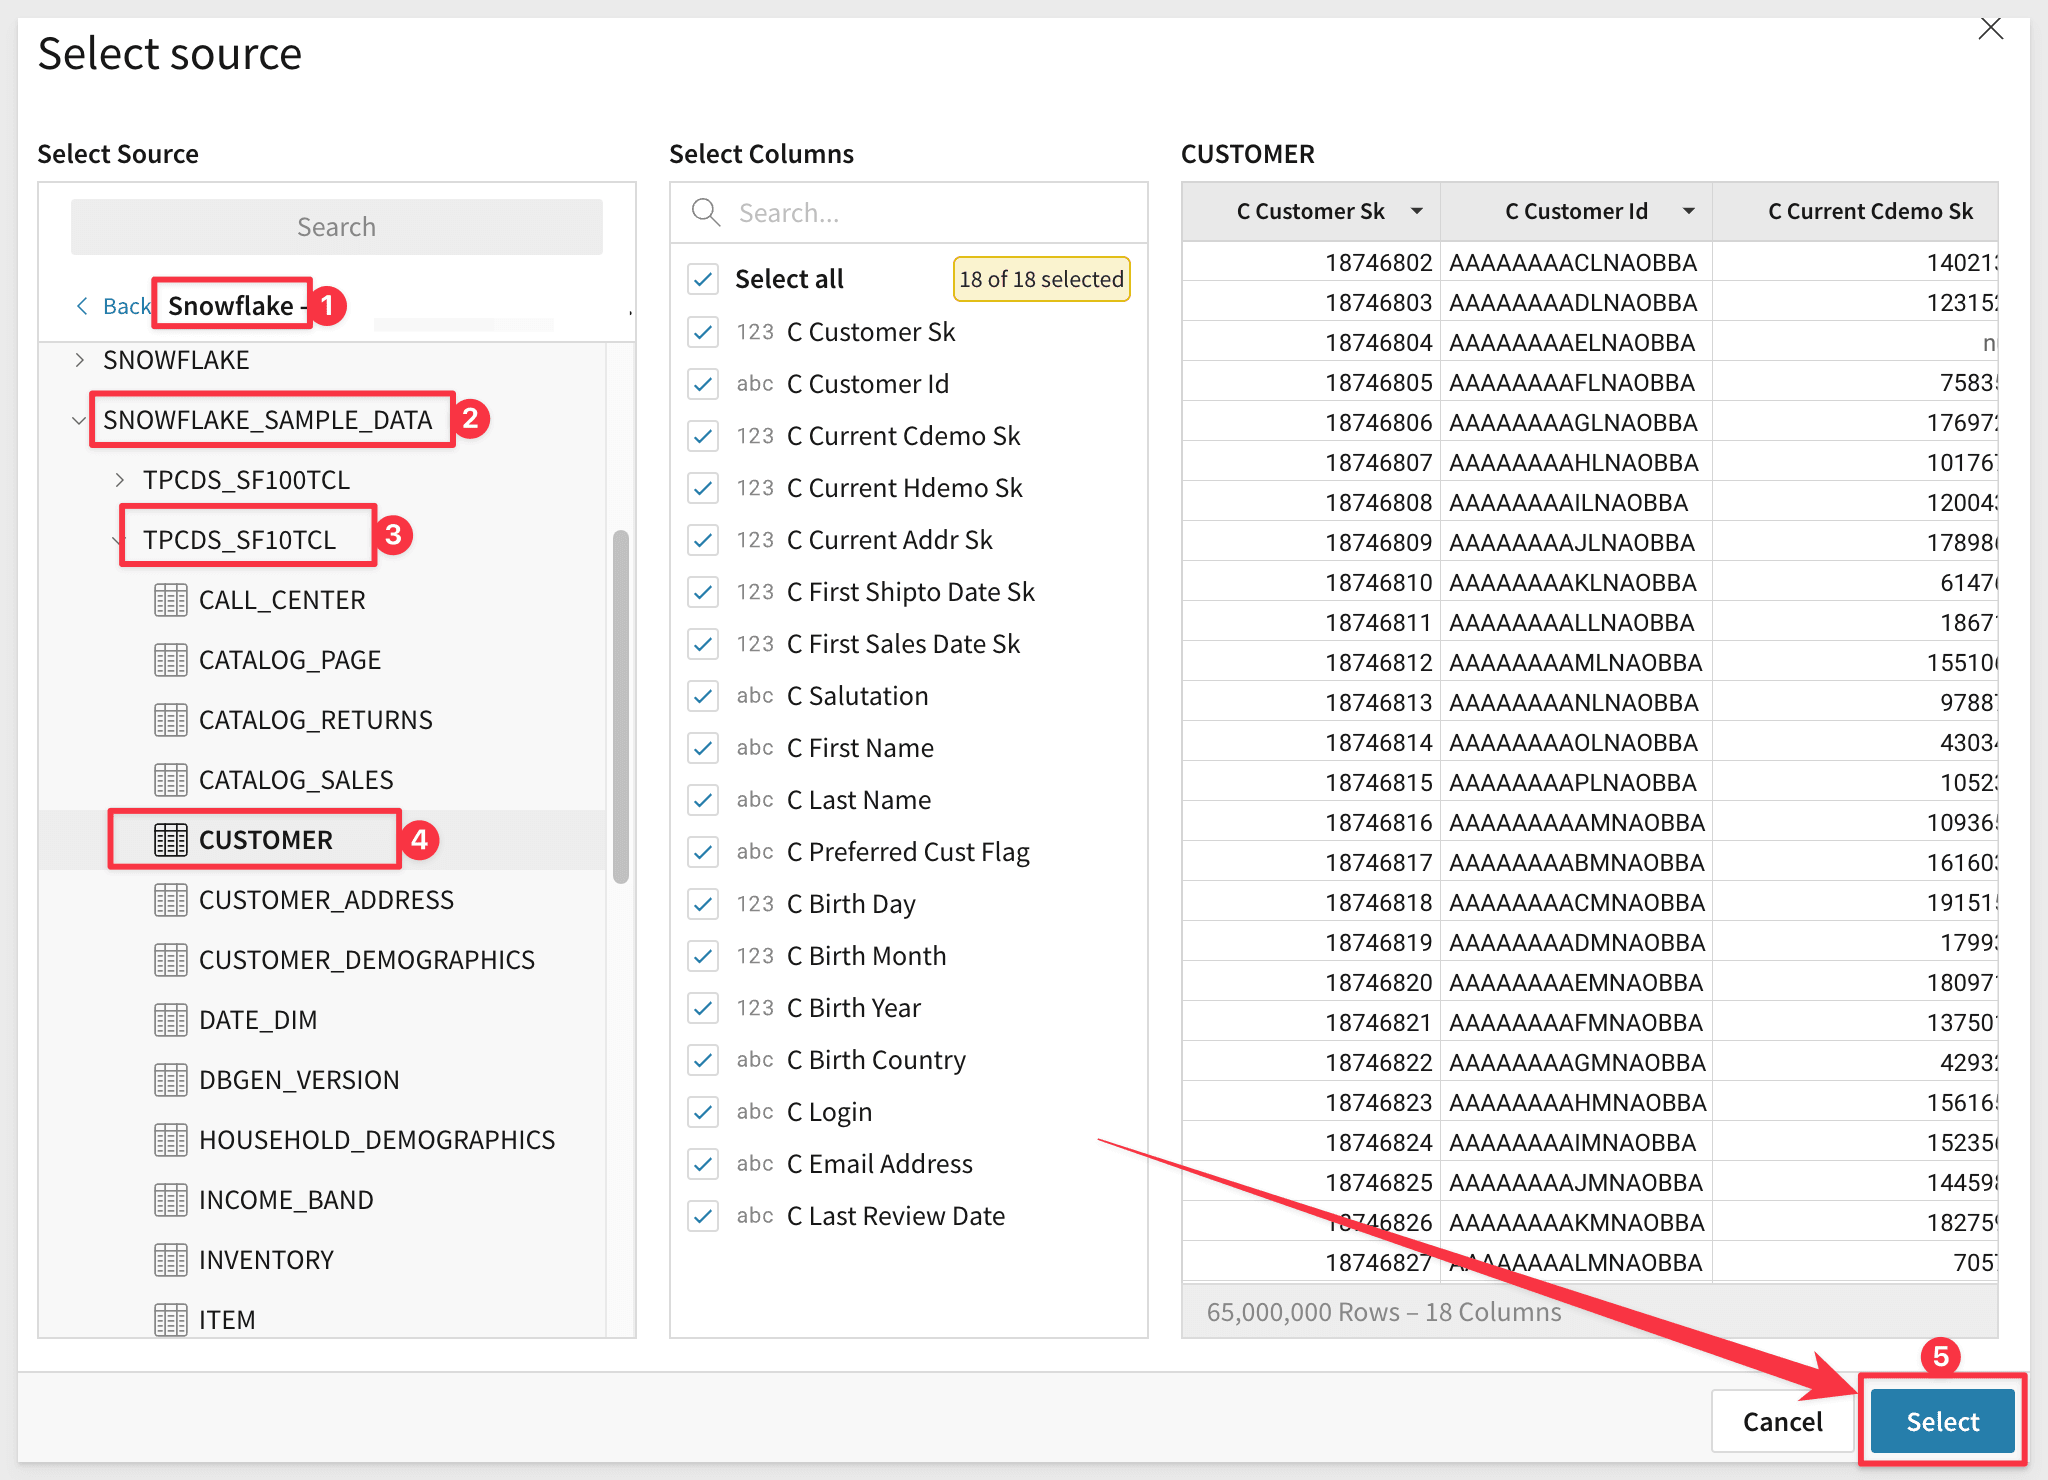
Next, click Tables and Datasets.
Go to the Snowflake connection you created and Select your user or customer table.
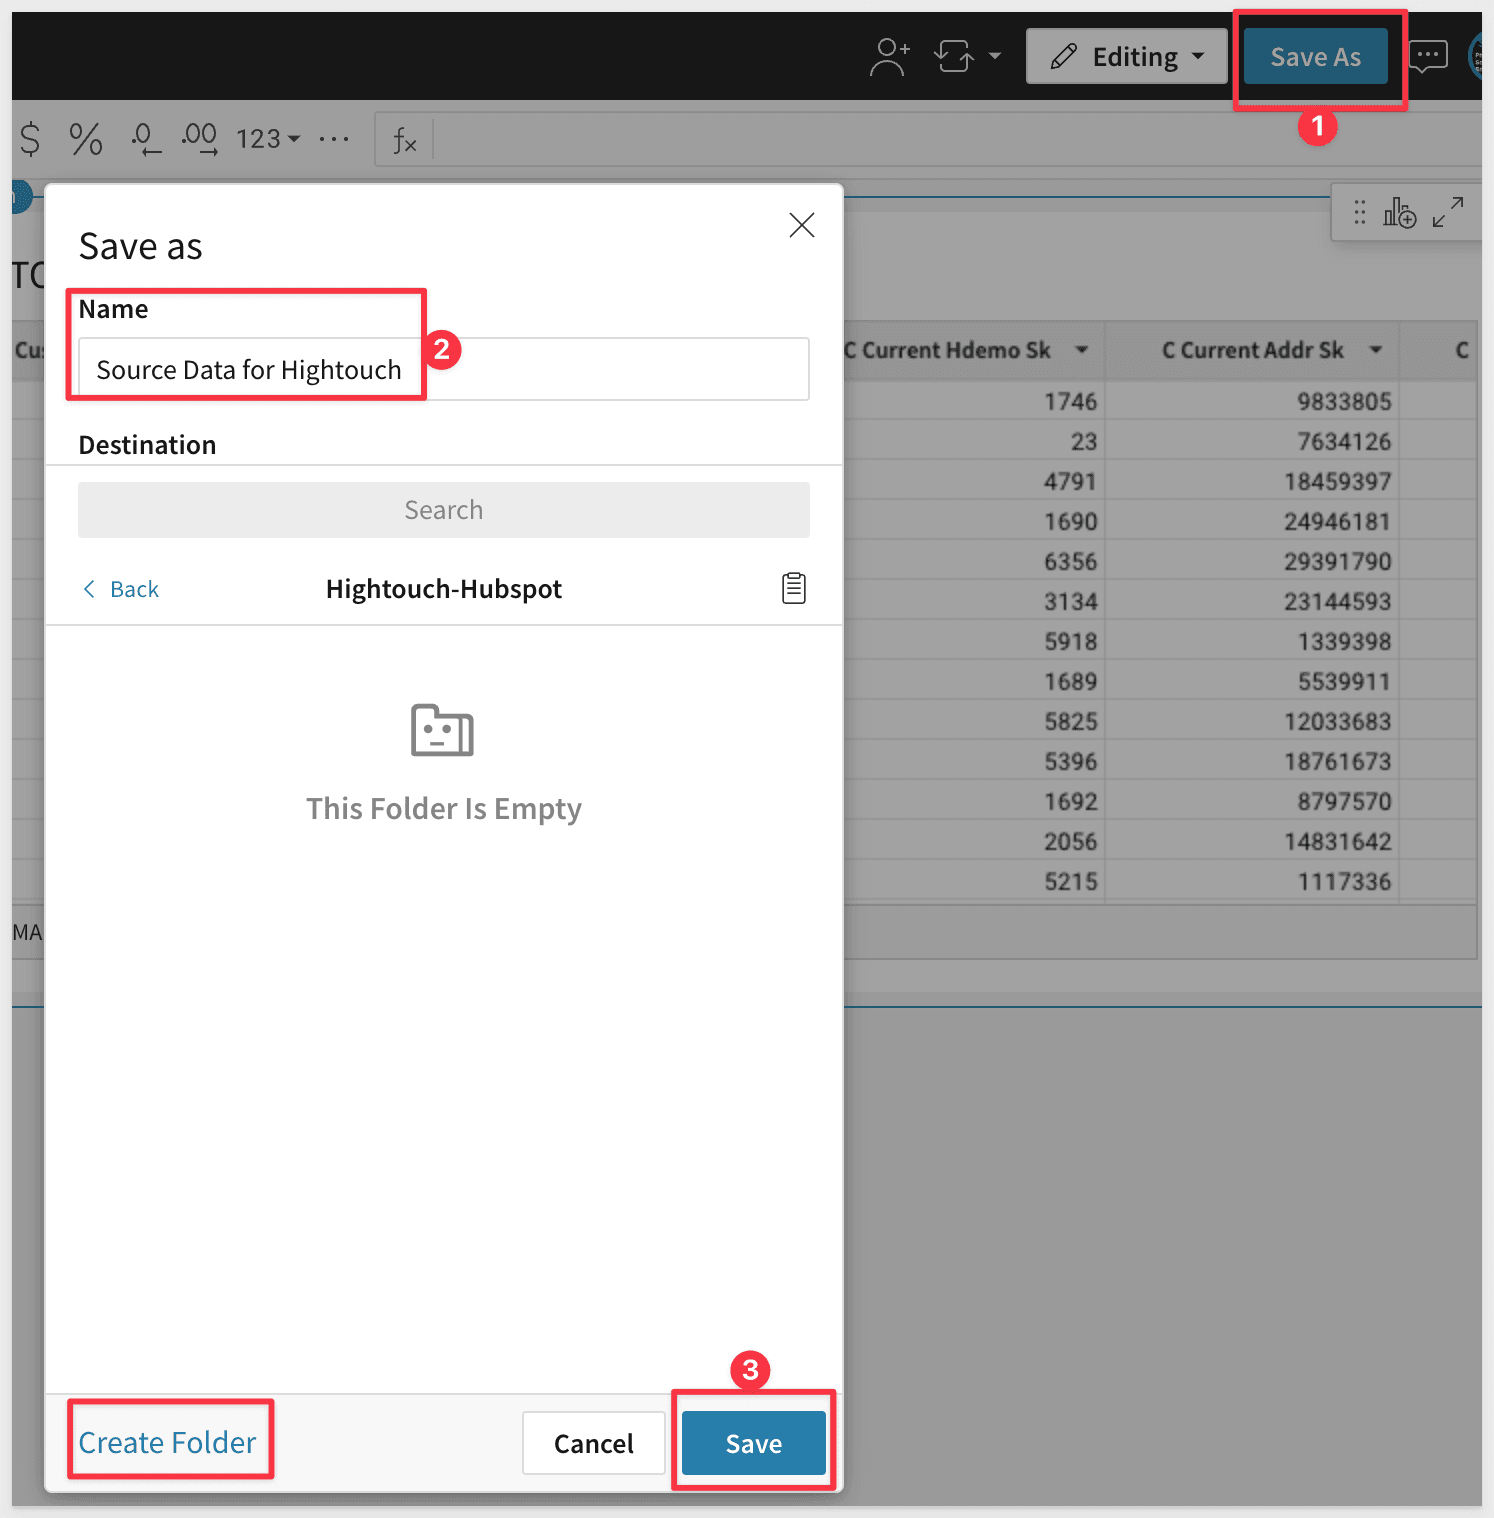
Now is a good time to save our Workbook. Click the Save As button in the upper right corner and give it a descriptive name like Contact Data.
Next, you can target specific contacts using filters. In this case, suppose your marketing team only wants the most loyal US customers. The following steps use the column names provided in the Snowflake sample database, but you can use any columns in your dataset to filter it.
For the first filter (with Workbook in Edit), click on the column
C Preferred Cust Flagand select Filter.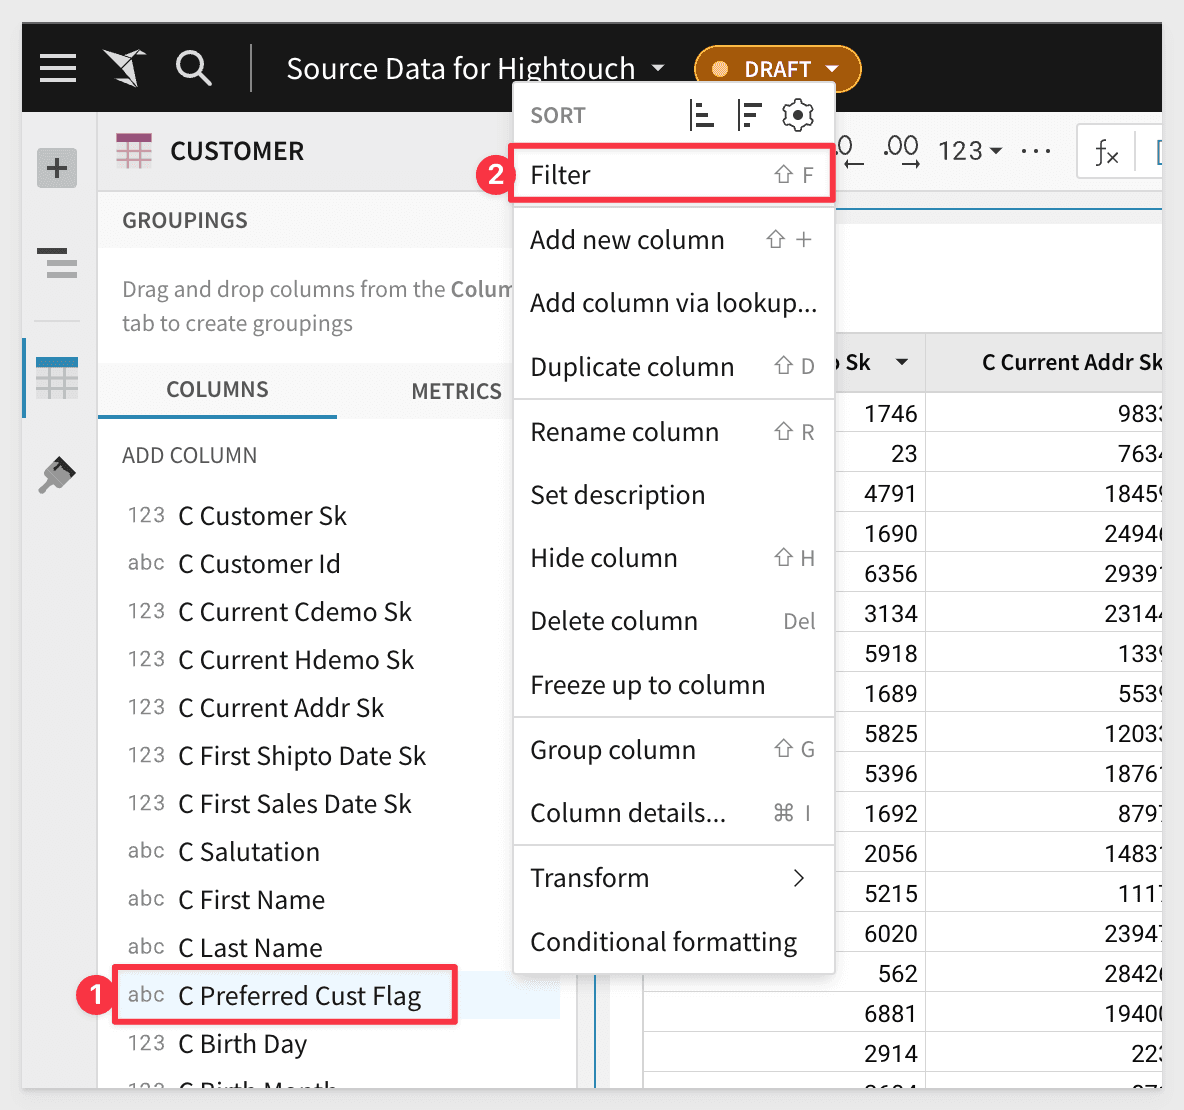
Select
Yto only include customers who have this flag.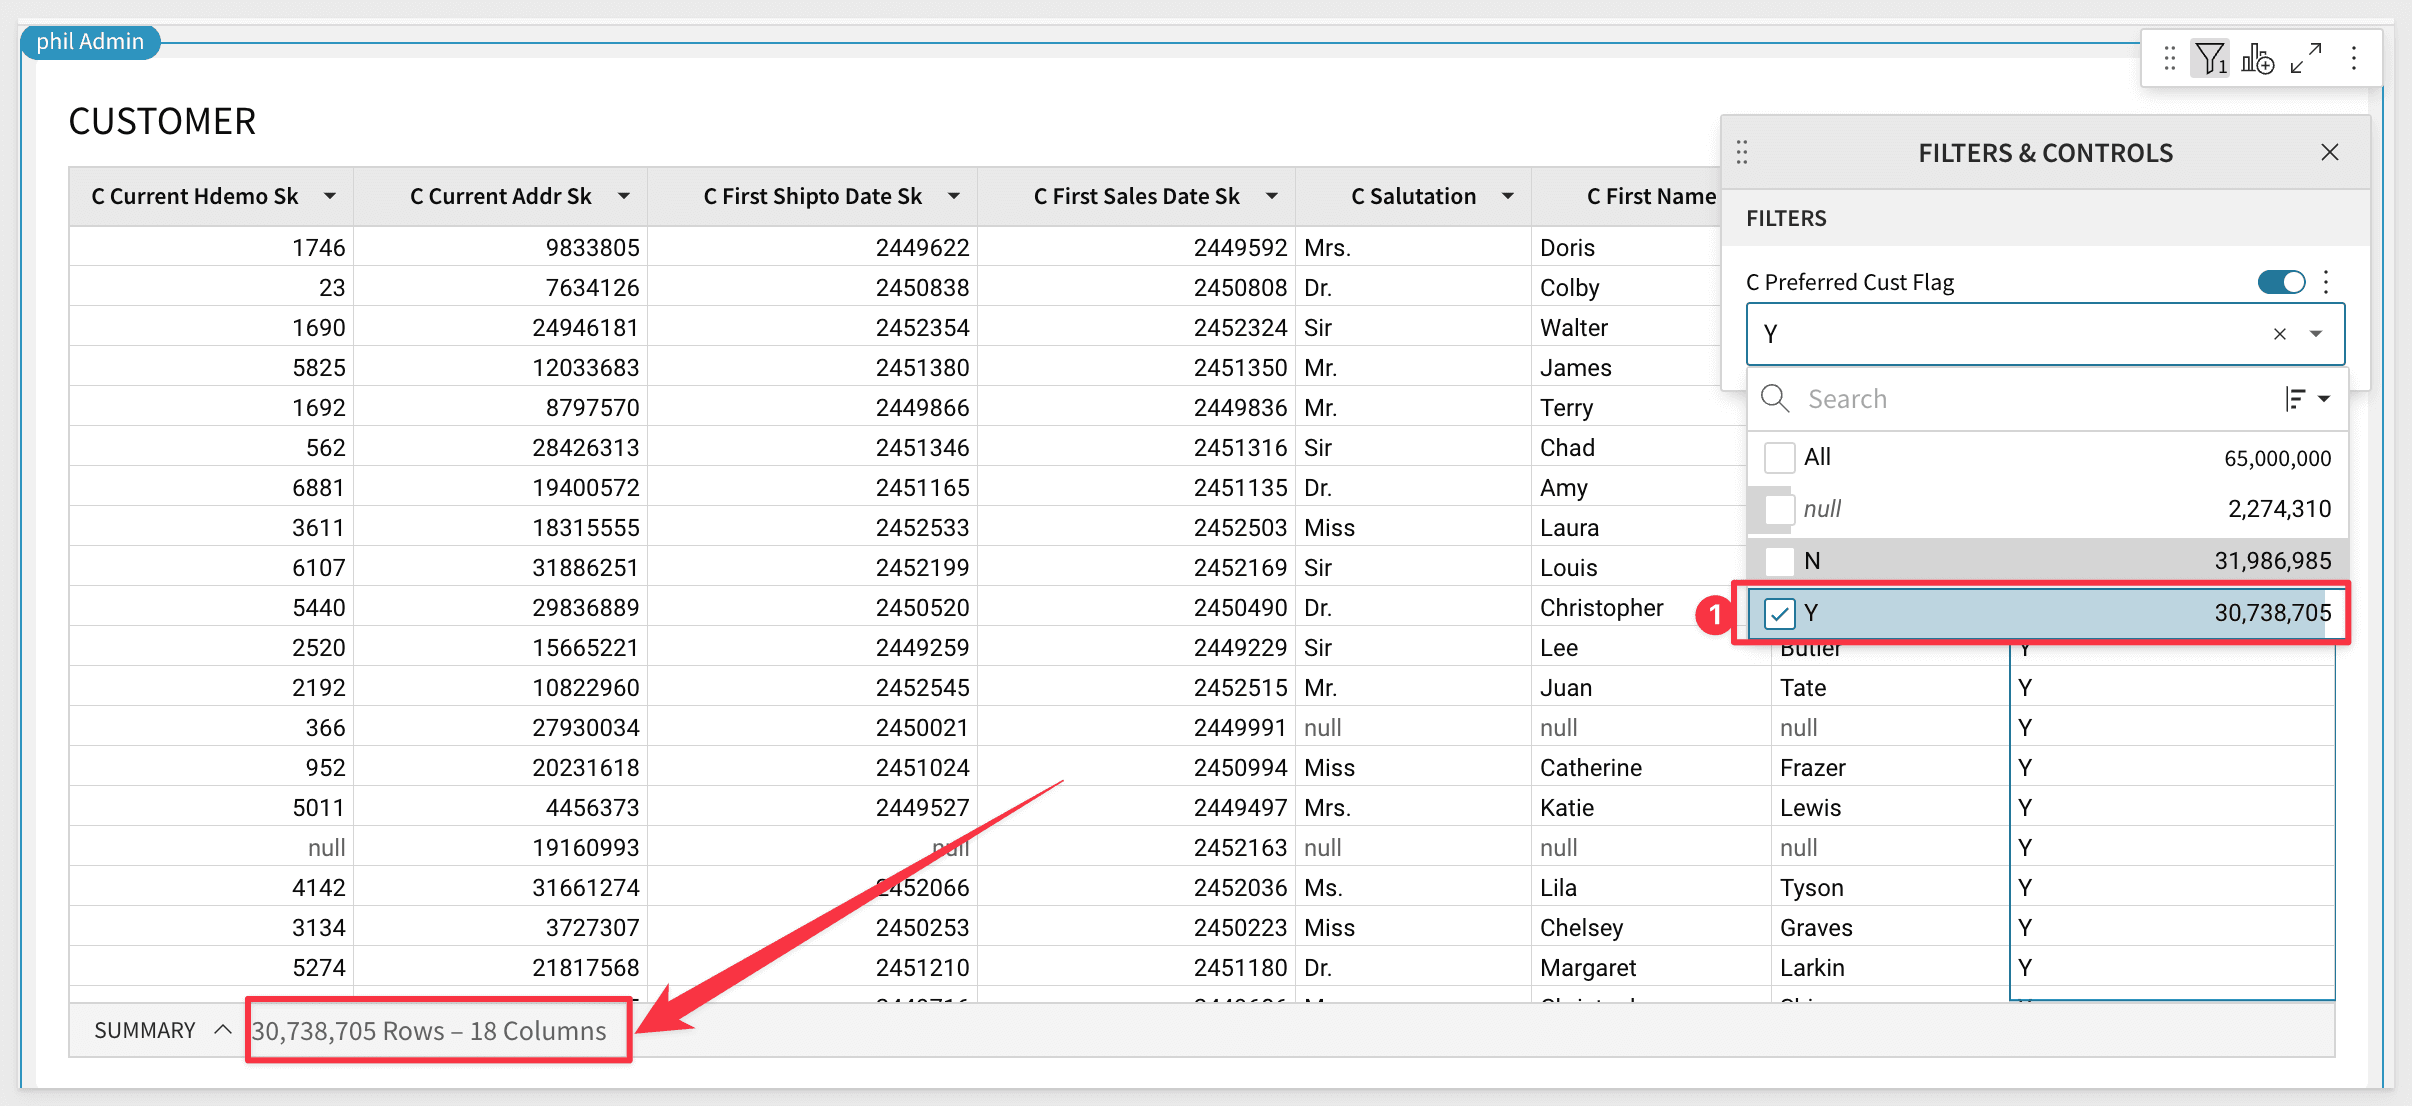
Now add filters for the columns
C Birth Country: UNITED STATESand/or any other filters you want to use.Before moving on, double-click the page tab to rename the Workbook page to
Source Dataor another descriptive name.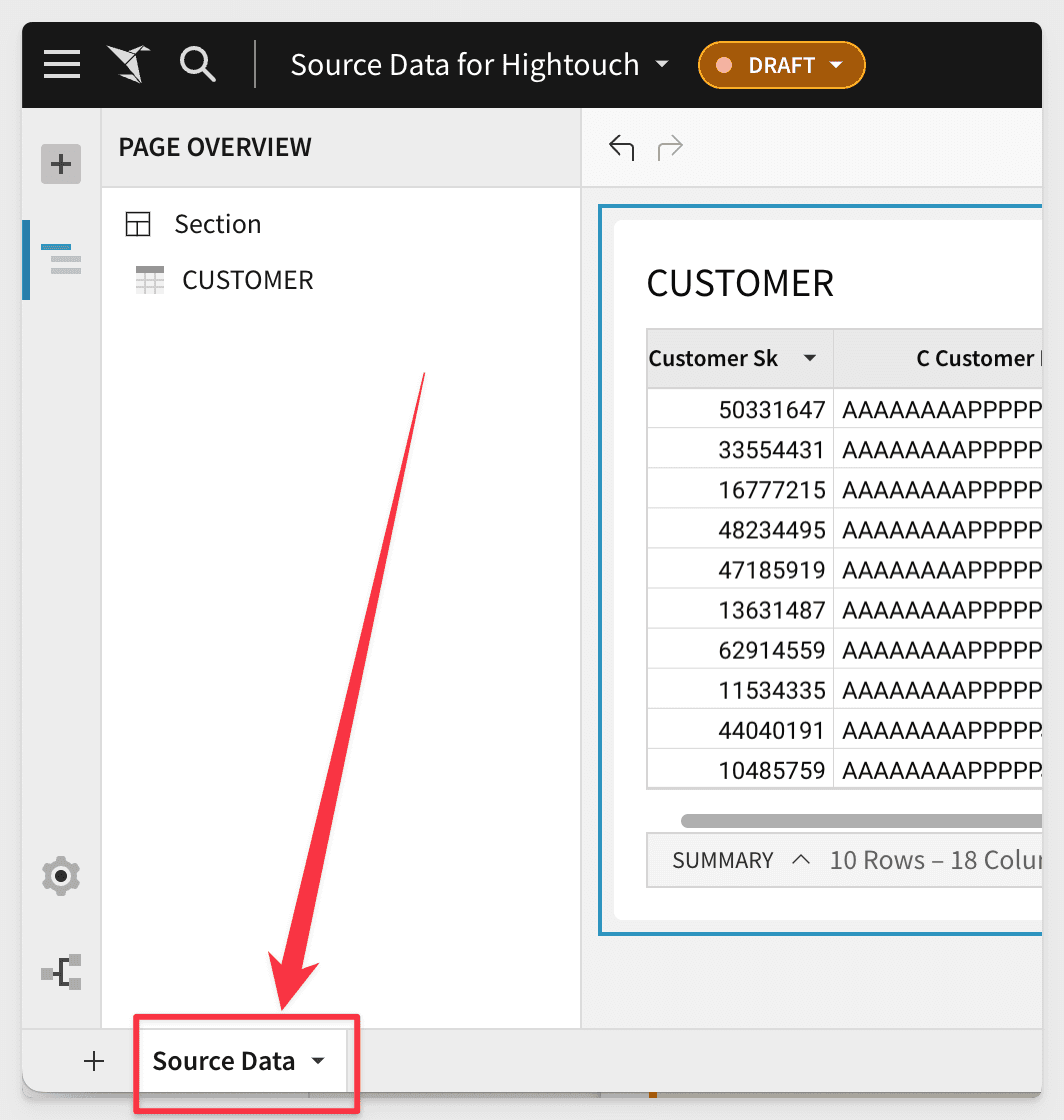
You’ve now defined your source data. If you want to enrich the date, you can use Sigma Input tables. Input tables are dynamic workbook elements that support structured data entry, writing it directly to your cloud data warehouse. Currently, only Snowflake is supported.
Workbooks enable you to integrate new data points into your analysis and augment existing data from Snowflake to facilitate rapid prototyping, advanced modeling, forecasting, what-if analysis, and more—without overwriting source data.
Suppose you want your team to supplement and validate contacts before sending the data to HubSpot. Sigma’s Input Tables allow you to do just that. Follow these steps to see an example of how to add new columns for data and validation to Sigma.
On the Customer table, click to add a Child Element and select Linked Input Table. A Linked Input Table will source distinct values from a parent element and allow you to add additional columns for data entry.
You’re then prompted to select how to join the new input table to the source and which additional columns to include. The example screenshot shows using
C Customer IDas the unique identifier to join rows and First Name, Last Name, and Email Address as the rows to include in the Input Table.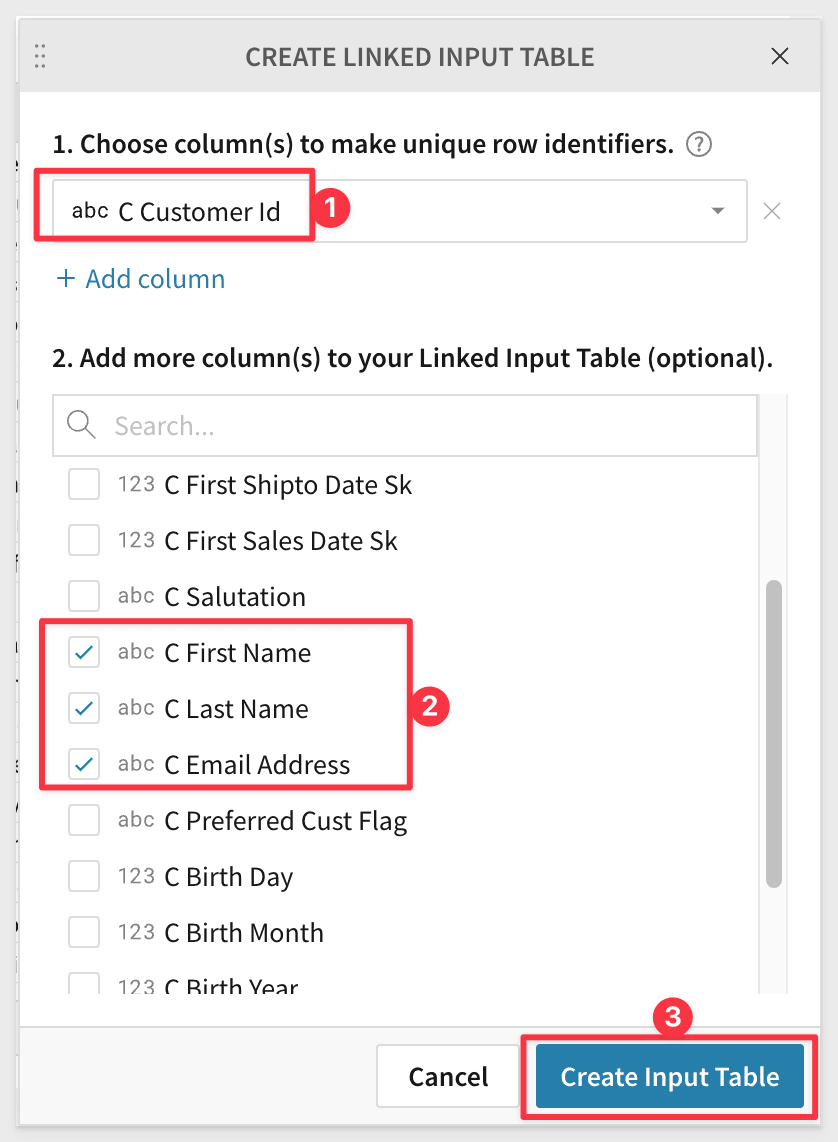
Rename the new Input Table by double-clicking on its default title. Give it a descriptive name like
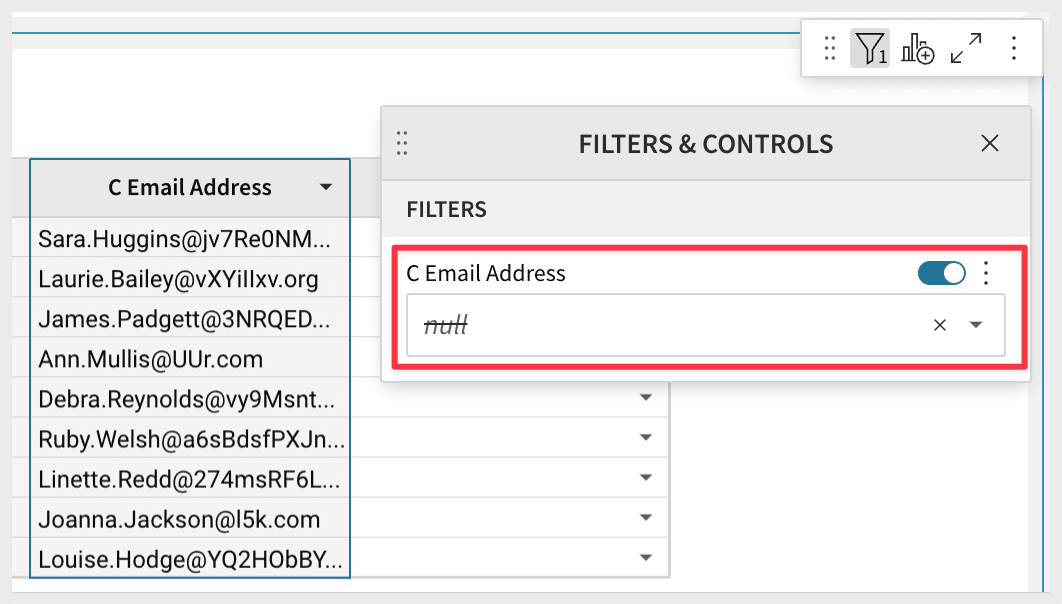
Lead Management.If necessary, you can add filters here for null values for email addresses. This is a required field for HubSpot contacts, so it's necessary to remove them before attempting to sync them to HubSpot.
To add a new column, click to add a New Column > Text:
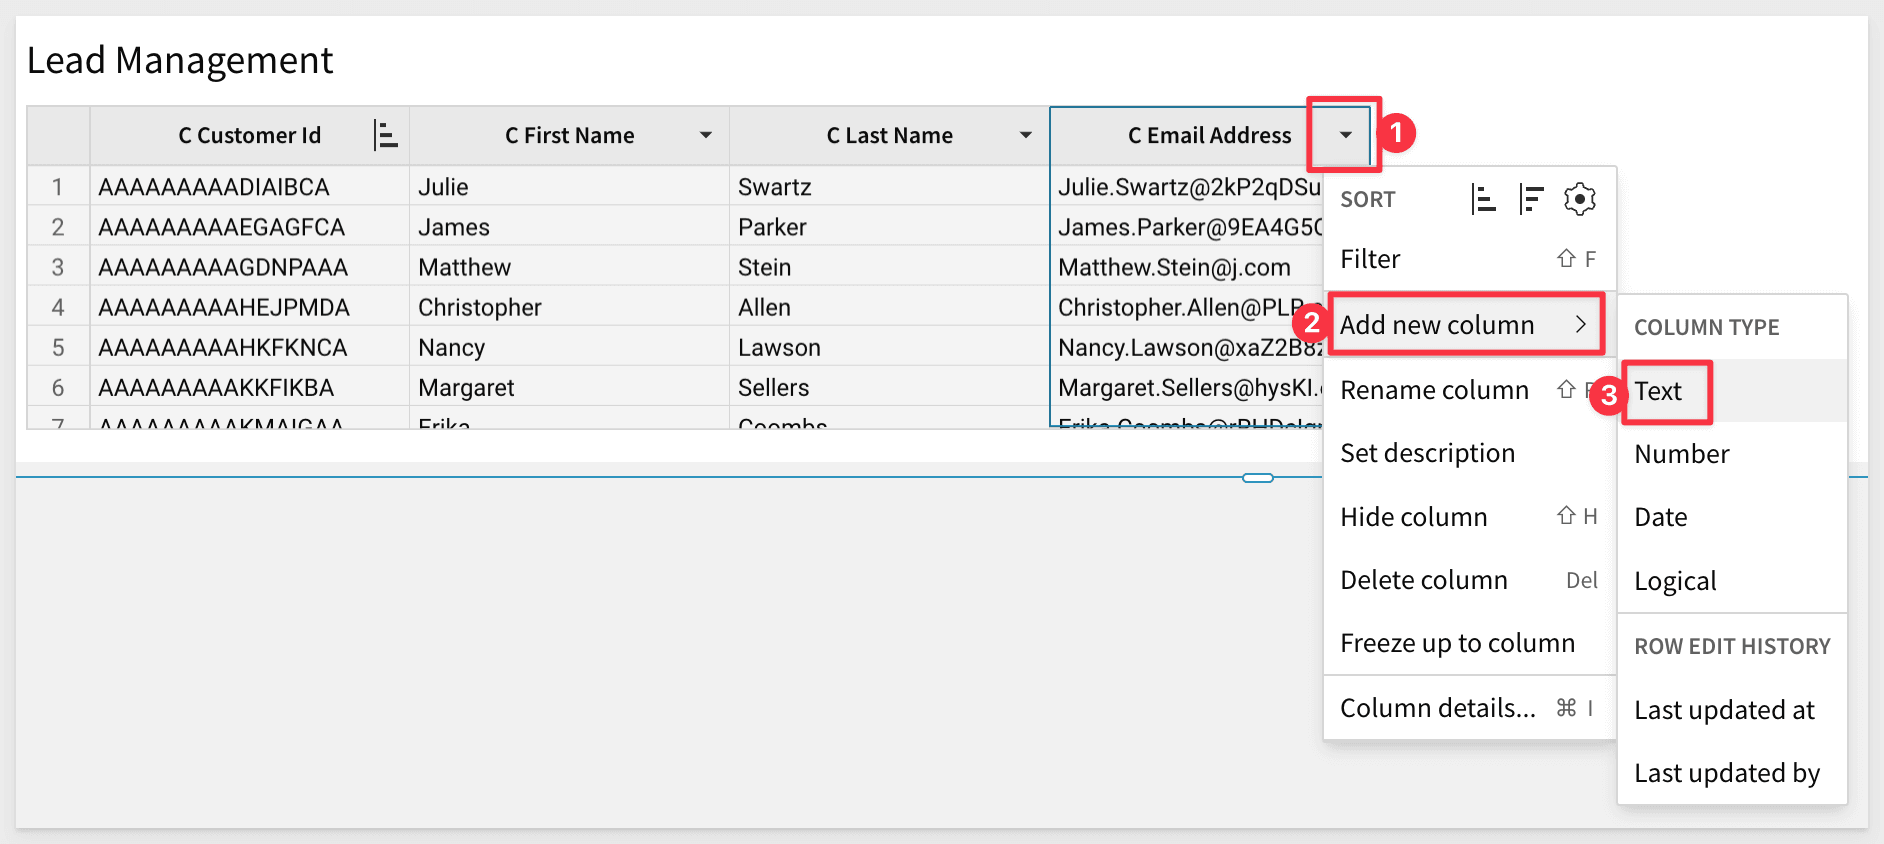
Rename the column by double-clicking its name in the header. This example shows adding a Lifecycle Stage column.
The Lifecycle Stage property in HubSpot only accepts certain values. You can add this data validation in Sigma: Click the
Lifecycle Stagecolumn and select Data Validation.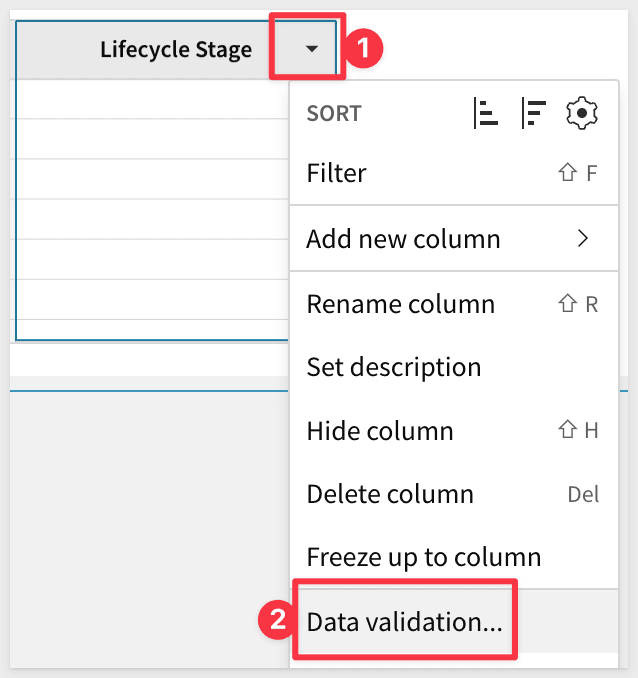
Select Create a manual list for the Value source.
For list values, enter
lead,opportunity, and any other options you want. HubSpot natively supports these values. In order for the sync to work properly, you must enter the case-sensitive internal values likemarketingqualifiedleadand notMarketing Qualified Lead.HubSpot also allows you to create custom lifecycle stages and edit the default lifecycle stages.
Click Save when you’ve finished adding values.
Now your team can select from the allowed list for each row to triage the list. You can follow the steps to add another column so your team can indicate if the row is approved to send to HubSpot.

As before, click New Column > Logical to add a new column. This lets users select True or False, with true being approved.
Rename the column to
Sync to HubSpot.Lastly, move this table to another page and rename the new page
Lead Approval.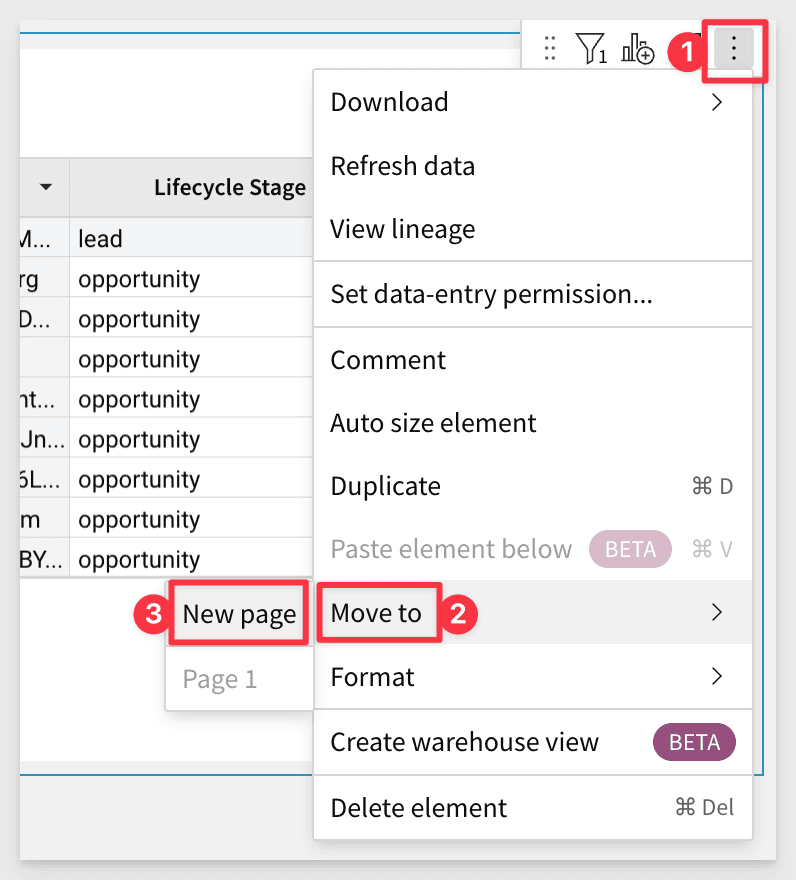
With Sigma setup complete, it’s time to use Hightouch to sync the data to HubSpot. There are a few configuration steps in Hightouch:
- Connect the source data (Snowflake)
- Set up a model using Sigma
- Connect to HubSpot
- Configure the sync
A source is where your organization's business data lives. The Hightouch extension uses Sigma as a modeling method, not a data source. In other words, Sigma provides the SQL query, not the query results. Before using Sigma to query the data, you must create a source in Hightouch that connects to the same data warehouse used by Sigma.
In Hightouch, go to the Sources overview page and click the Add source button.
Select your data warehouse as the source. This example uses Snowflake.
Enter the relevant credentials. These differ depending on the source. This is the generally same configuration data as used when configuring connections in Sigma. Refer to the relevant Snowflake documentation for further details.
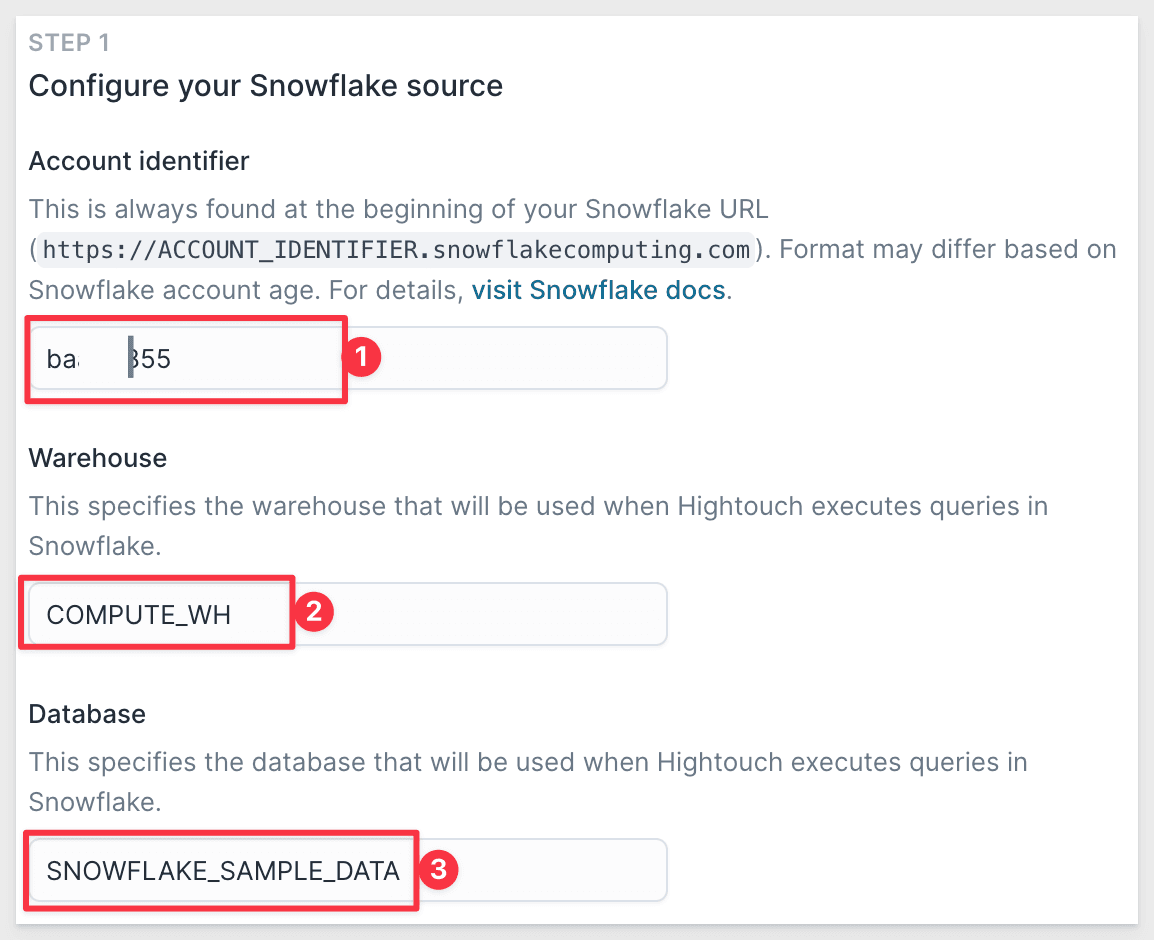
Click Continue. Before finalizing your source, Hightouch validates that you have the necessary access and permissions. If the test fails, you need to confirm and re-enter your credentials.
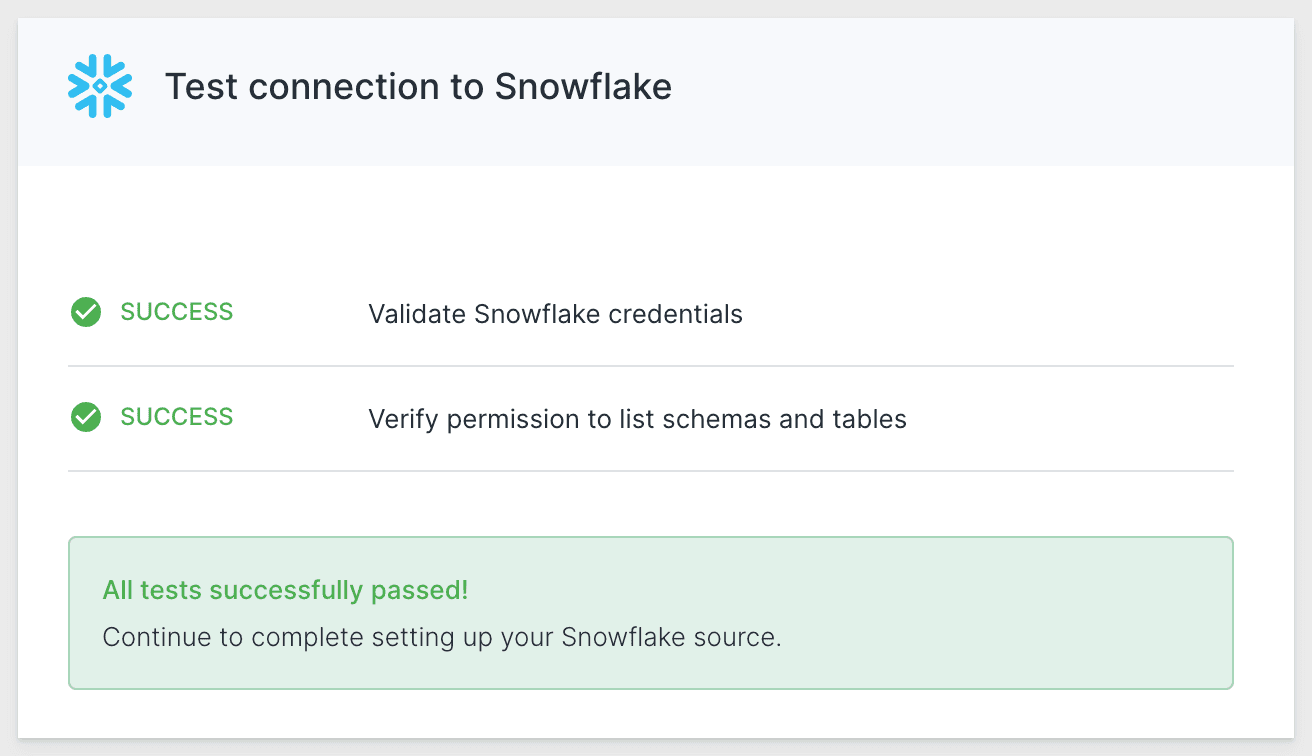
Give your source a Source name.
Click Finish.
Once finished, your source appears on the Sources overview page and can be used to set up models.
To use Sigma to create models, you first need to authorize Hightouch to access it. To do so, you need to create credentials in Sigma.
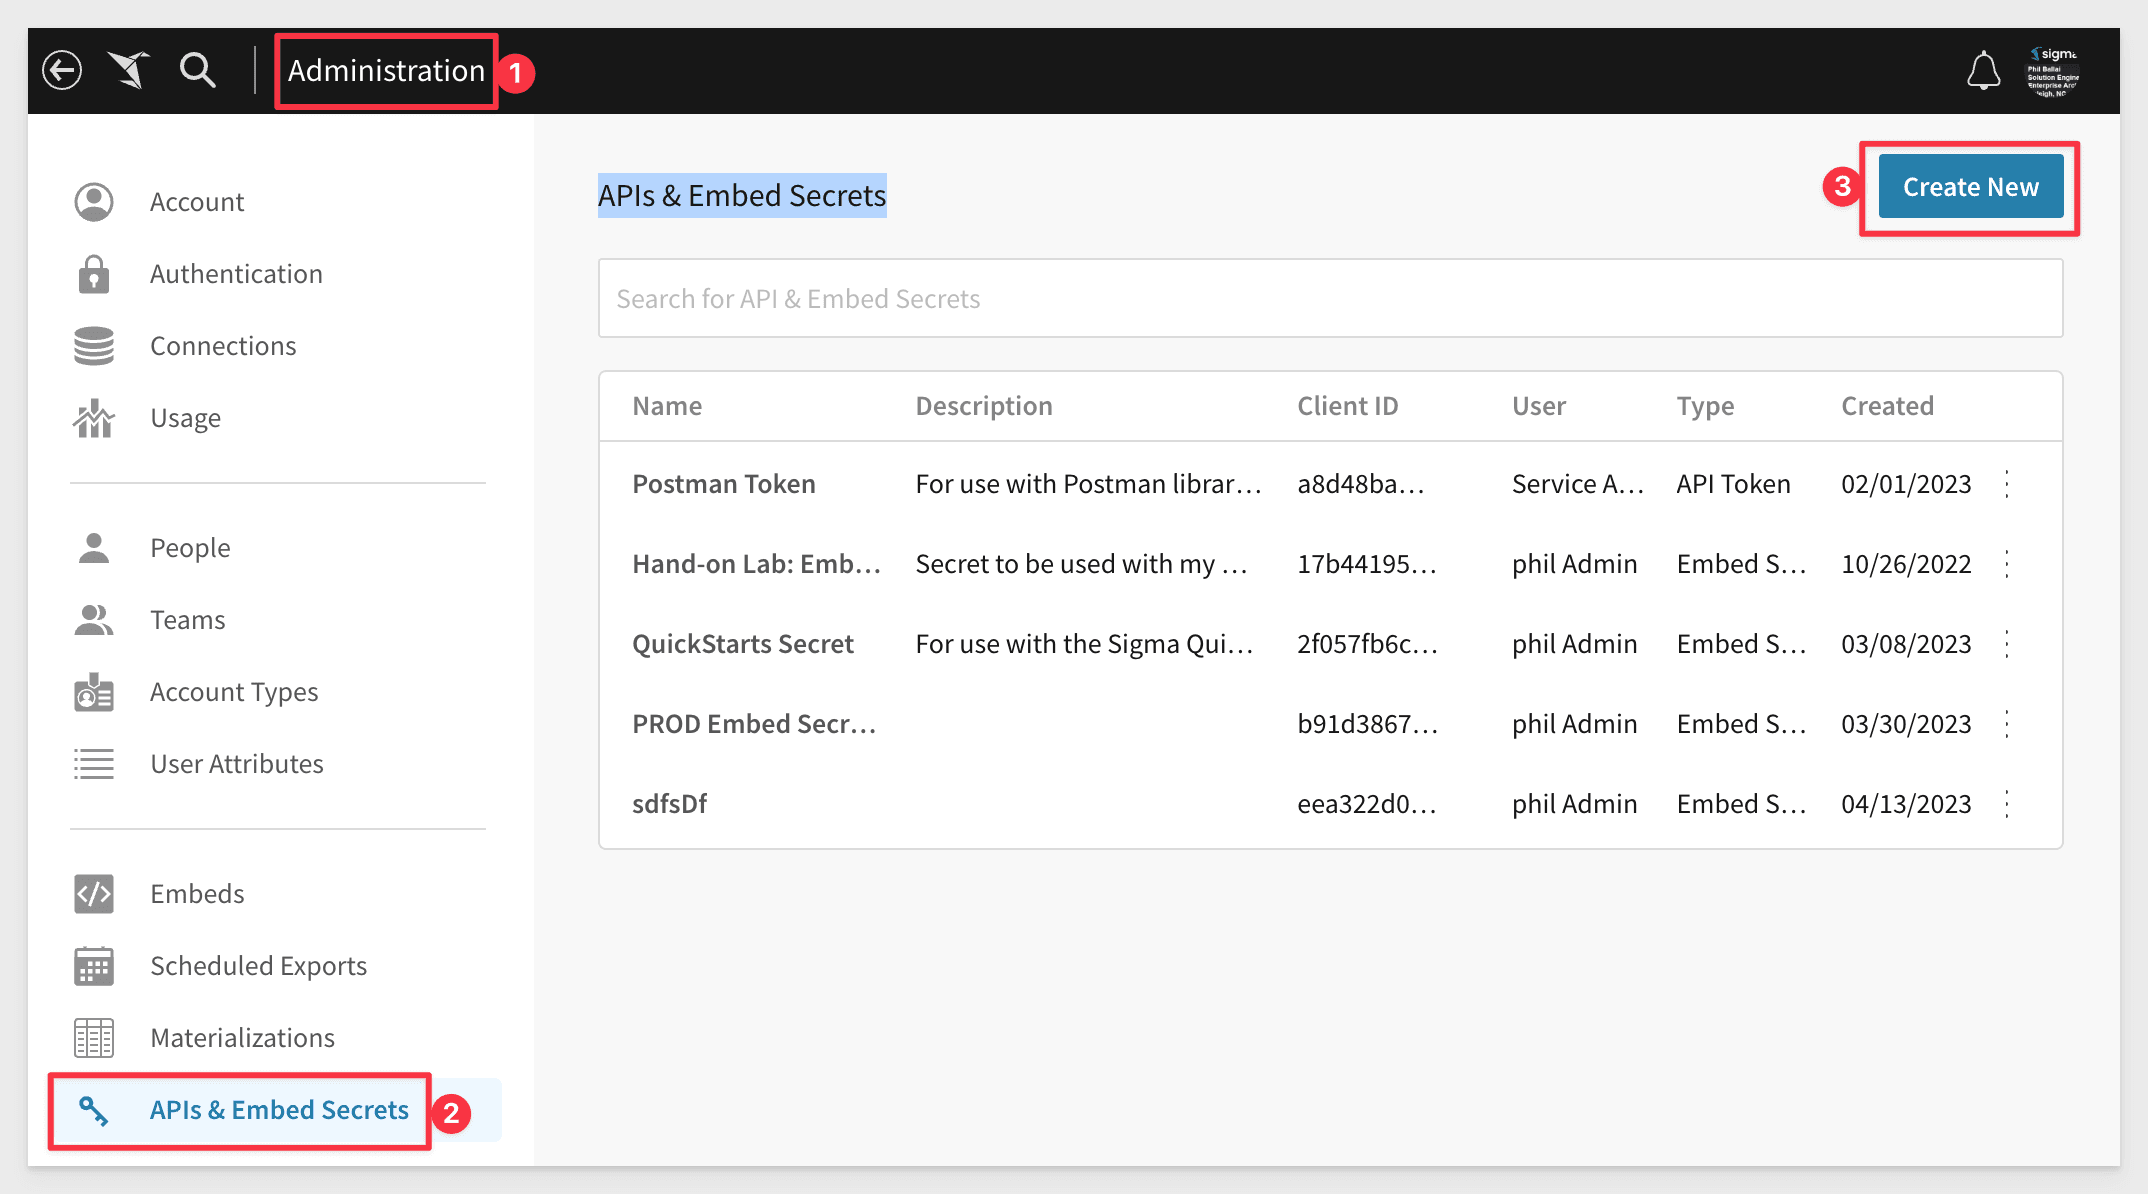
In Sigma, go to Administration > APIs & Embed Secrets and click Create New.
Select API Token, give it a name, description and assign an Owner.
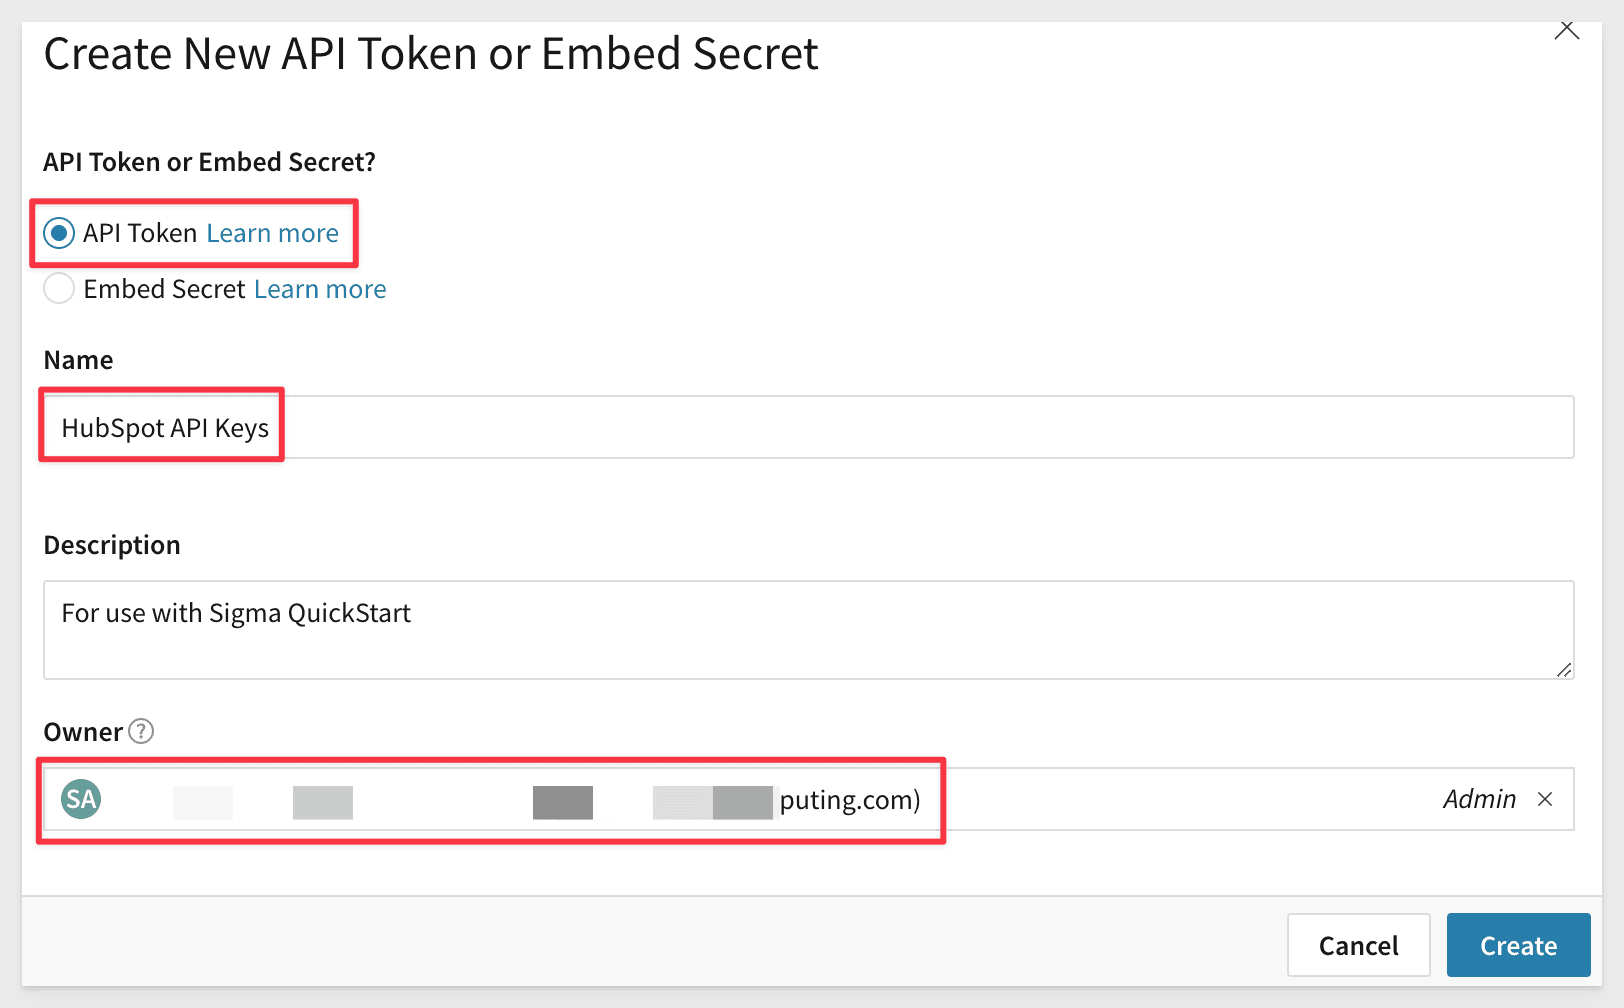
Click Create. This Workbook is explicitly shared with the Sigma user who created it by default. It is best practice to have a Service Account for integration and security automations. In production, it is recommended to assign keys to a dedicated service account as opposed to actual users. Users may leave the organization at a later time and causing the keys to become invalid.
Copy the Client Id and Secret values and save them in a secure location.
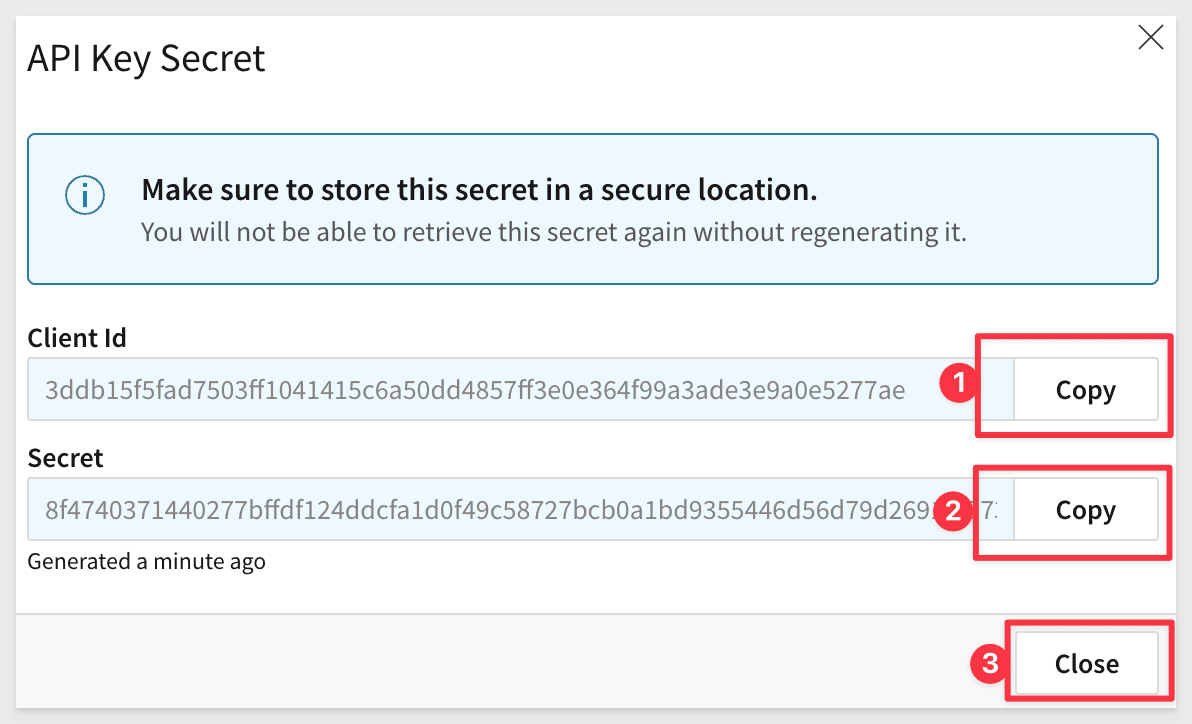
In Hightouch, go to the Sigma configuration page in Extensions.
Enter the following fields:
- Client ID
- Client secret
- Sigma Cloud
To determine which cloud provider is hosting Sigma, you can go to Administration > Account in Sigma.
When ready, click Connect. The connection will be tested and turn green once successful.
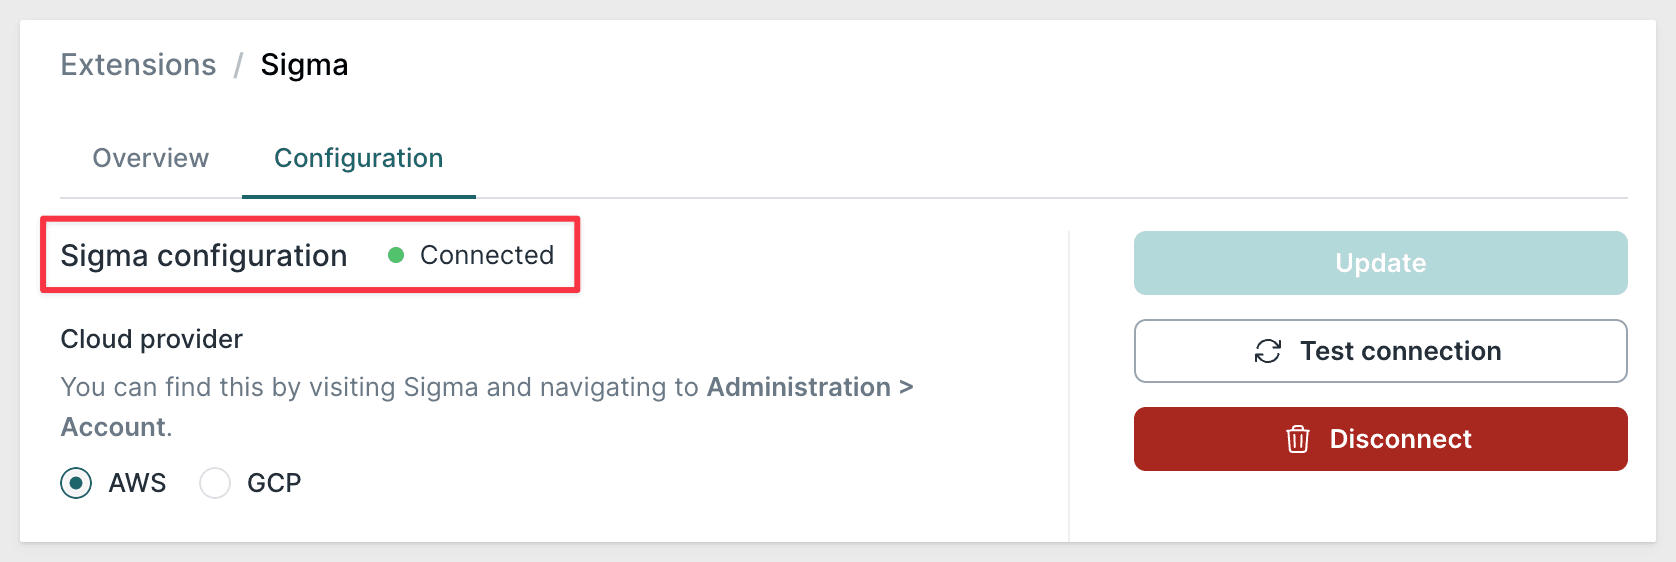
Hightouch models define what data to pull from your source. You can use the Sigma workbook you defined for your contact to set up a model in Hightouch.
Go to the Models overview page and click Add model.
Select the source you've just connected.
Select Import model from Sigma.
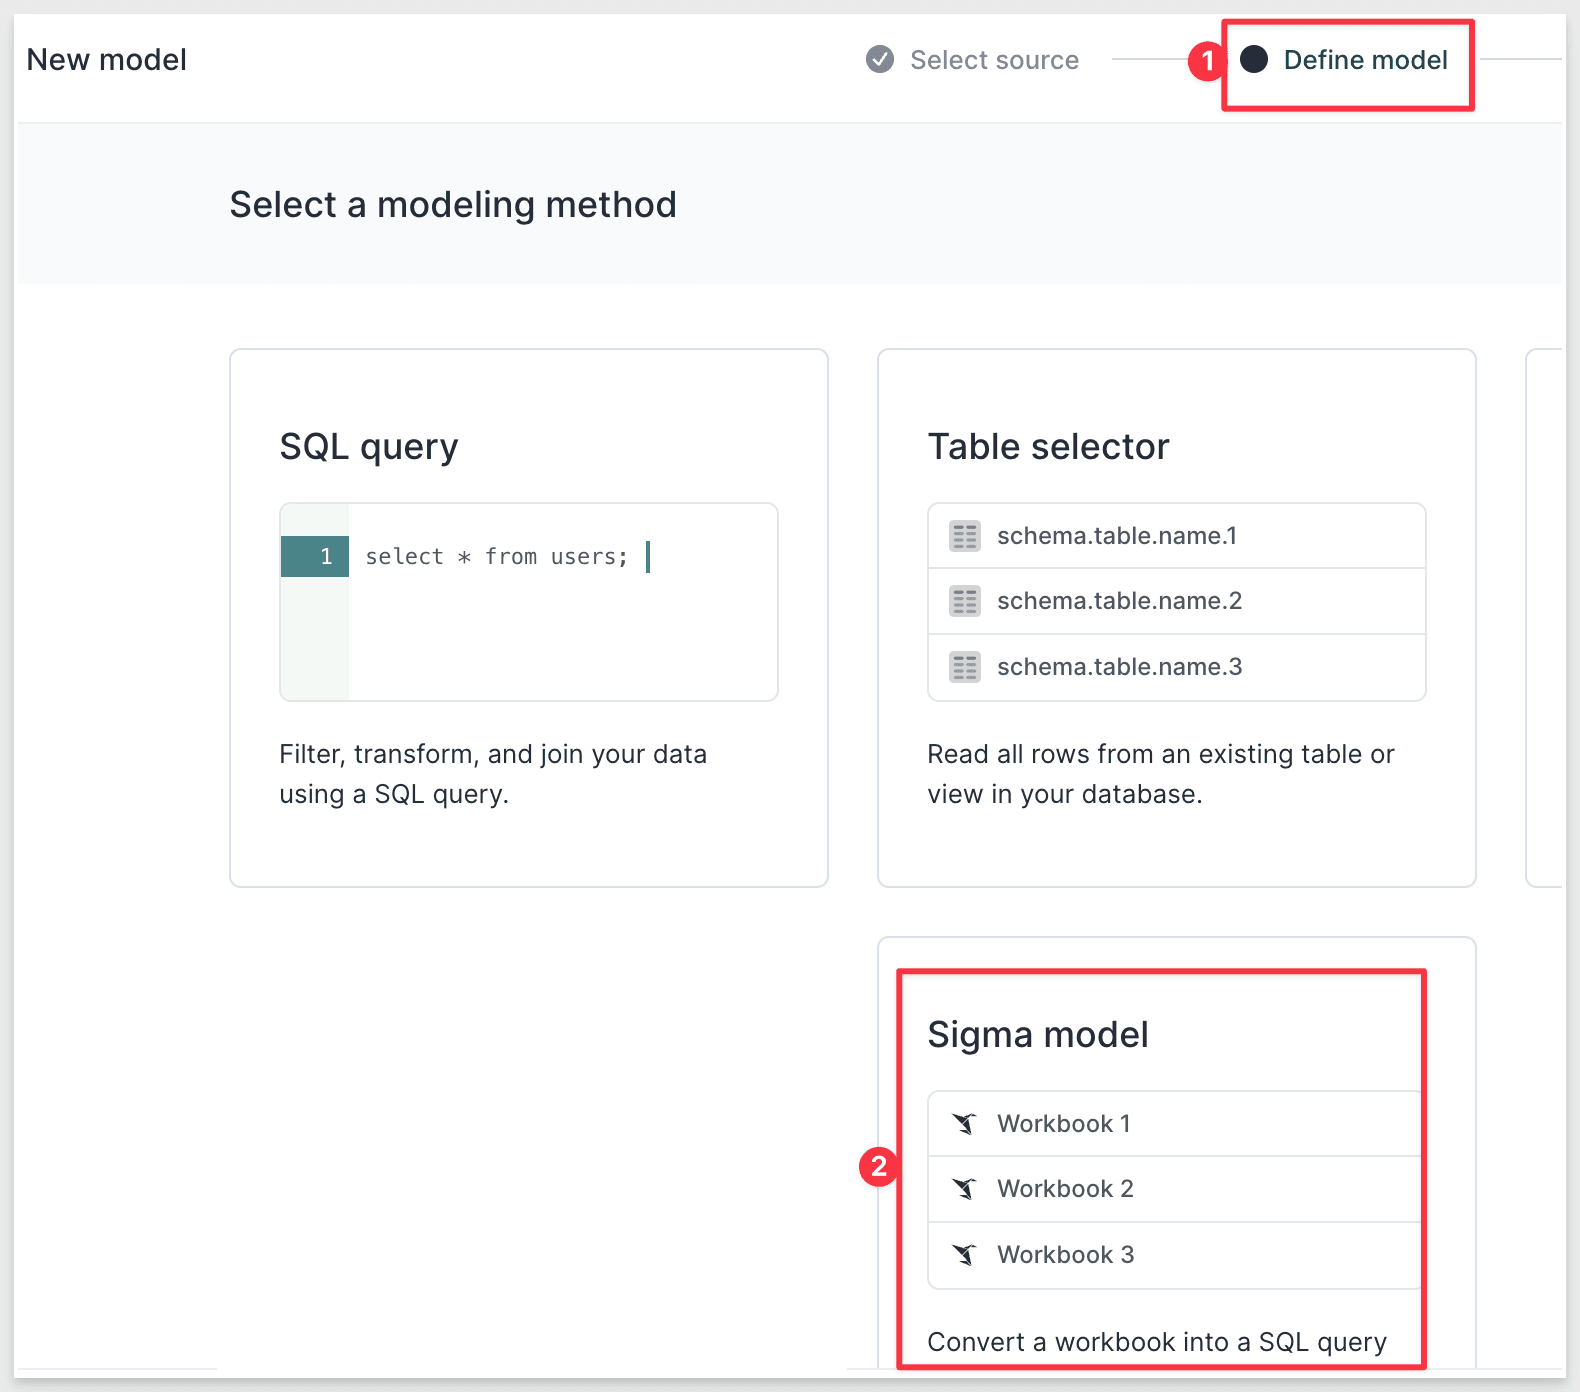
Select the workbook, page, and element that contains your contact data. In this case, the workbook is called “Source Data for Hightouch”, the Page is “Lead approval,” and the Element is “Approved Leads.”
Before continuing, you must Preview your model to ensure it's querying the data you're interested in. By default, Hightouch limits the preview to the first 100 records. Once you've validated your data, click Continue.
Name your model, for example, "[Sigma] Approved leads."
Select a Primary key. A primary key should be a column with unique identifiers, for example, a customer ID or email address. In this case, email works well.
Click Finish.
Once you've finished, your model appears on the Models overview page and can be used to set up the sync. To set up the sync, you first need to connect to HubSpot.
- Go to the Destinations overview page and click the Add destination button.
- Select HubSpot and click Continue.
- Give Hightouch access to HubSpot by logging into your HubSpot account. Ensure your account has the appropriate permissions to update contacts.
- Click Continue.
- Give your destination a name.
- Click Finish.
Now you can finally start syncing your data!
Syncs declare how your source data should appear in your destination. They're the final puzzle piece after setting up a source, model, and destination.
Go to the Syncs overview page and click the Add sync button.
Select the Sigma model you previously created for this purpose.
Select the HubSpot destination you previously created.
Select an Object to define where Hightouch should sync your data to and then select Contacts.
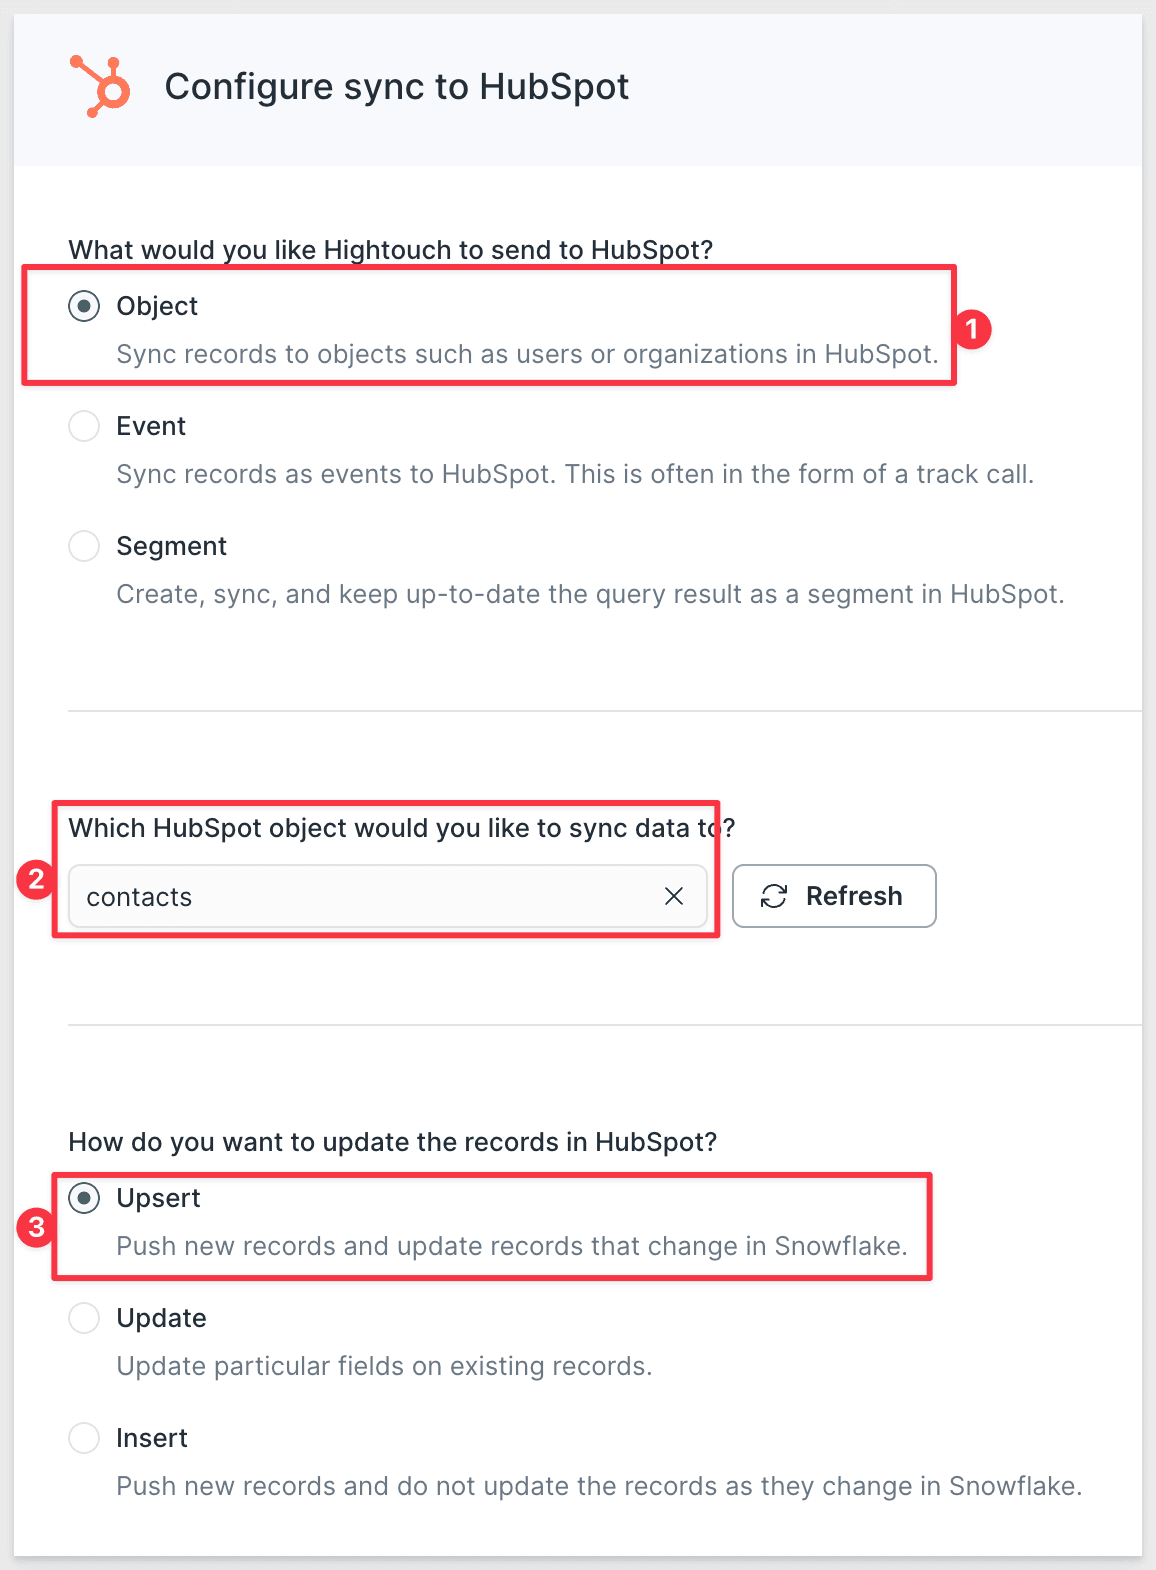
Select your sync mode. Upserting is generally a good choice for CRMs. Hightouch supports just updating existing contacts or just inserting new ones. Upserting allows you to both update existing contacts and insert new ones.
Scroll down and select the column to match records on. For contacts, email is a good choice. Hightouch recommends this column for record-matching contacts since it’s a property that HubSpot automatically deduplicates on.
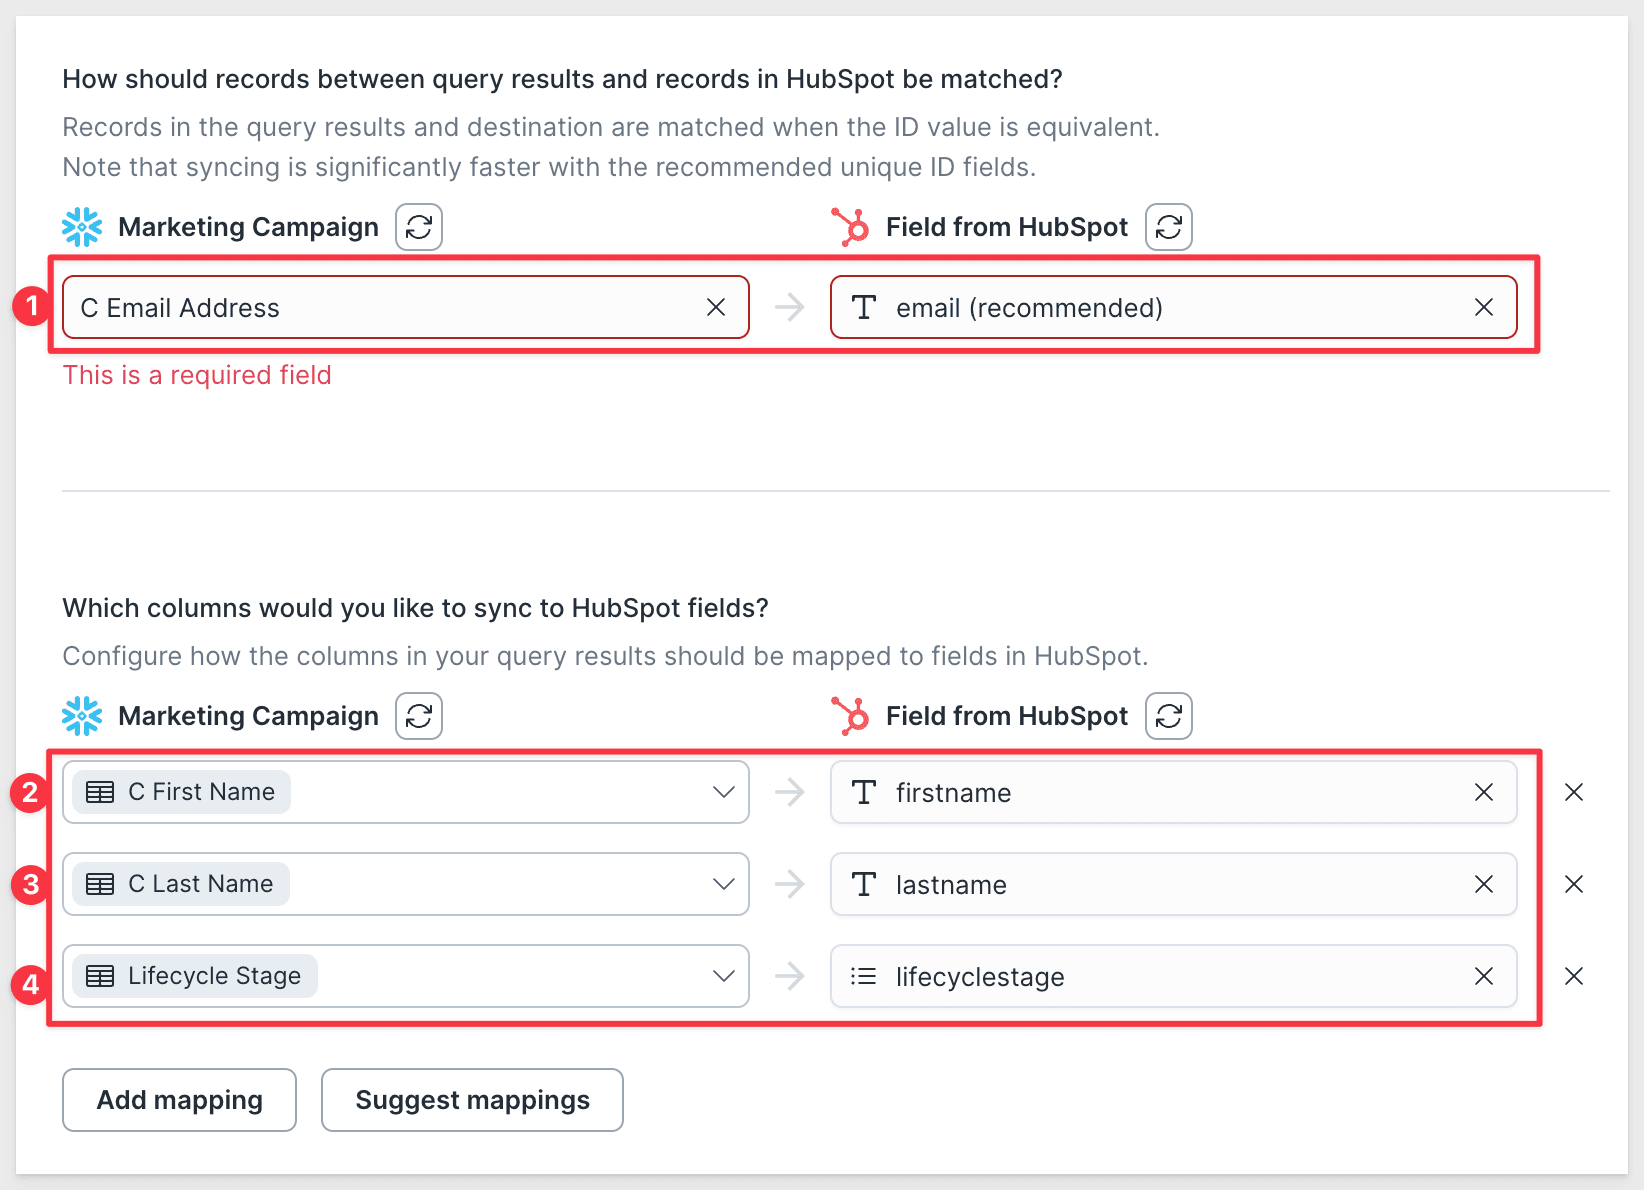
Next, select which columns should be included in the sync and which contact properties should be mapped to HubSpot.
Click Continue.
- Set a schedule for the sync. Your schedule depends on how frequently you need your data to update. You could set an hourly interval or a custom recurrence, for example, every day at 8 am, or use a cron expression to create something more custom, for example, hourly on weekdays during business hours.
- Click Finish.
Once you've finished configuring a sync, you land on that sync's overview page. This page shows previous sync runs and lets you edit the Configuration, Schedule, and also set up Alerts. There’s also a Live Debugger, which helps understand previous runs down to the API request and response level.
If you've scheduled your sync to run immediately, you can inspect your data in HubSpot right away. If you've scheduled it for a future time, it's best practice to test it now by manually running it now and ensuring it appears in HubSpot as expected.
If you selected to run the sync manually rather than at a scheduled time, click Run Sync.
Once the run completes, you should see a Healthy status.
The last thing you need to do is see the data landed in HubSpot.
Log into your HubSpot account and to Contacts. Check to see if the contacts you’ve added appear.